Develop and test RLS Rules in Power BI
Introduction
Many of my clients want to restrict access to the data in their reports based on specific rules.
Access to data is called Row Level Security (RLS in short).
You can find many articles about RLS in Power BI on Medium.
I added two of them in the References section below.
While all the articles do a good job of explaining the basics, I always miss an explanation on how to develop more complex rules and how to test them easily.
In this article, I will explain the basics of RLS and add complexity step-by-step.
In addition, I will show you how to use Dax Studio to build queries to test RLS rules before adding them to the data model.
So, here we are.
Scenario
I use the Scenario where Users get access to Retail Sales data based on Stores or the geographic locations of Stores within the company, including a combination of both.
In the Contoso data model, I use the following tables:

I create the following report to test my results:

Create a simple rule
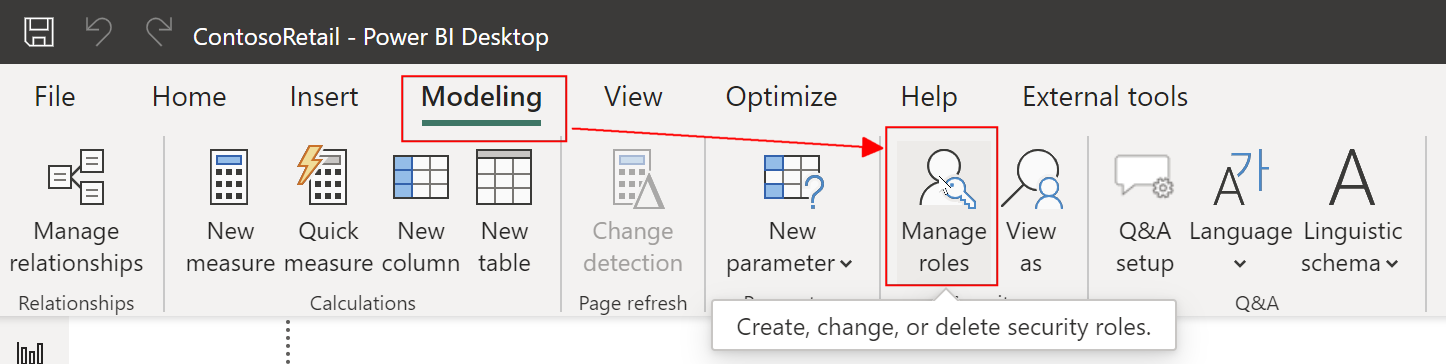
To create an RLS Rule, you need to open the Security role editor:
Next, you can create a new Role and set the name for this Role:

In my case, I put the name to "StorePermissions".
Now, I can start adding an expression to control access to the Store table:

We have had a new, simpler editor for RLS rules for a few months.
In my case, I want to add a DAX expression. So, I click on the "Switch to DAX editor" button.
At first, I add the simplest possible expression: TRUE()

To understand RLS Rules, you must know that access is controlled by the output of the expression in the RLS rule editor.
The user will get access if the output of the expression is not empty or FALSE().
In principle, any expression in the RLS rule editor is added as a filter to any query. Let's look at the effect of this first expression before I explain this in more detail.
To test the Rule, I save the expression and close the Editor.
Now I can View the report with the new Rule:

On top of the report page, you will see a yellow banner showing that you are looking at the report using the StorePermission Rule.
As the StorePermission rule doesn't restrict access, you will not see any difference.
Let's try something different.
Now I change the Expression in the RLS rule to FALSE().
When I test the Rule, I will not see any data:

This proves that data is accessible if the expression doesn't return FALSE().
Test query
To understand this effect in detail, let me show a DAX query to get the result without any restrictions:
EVALUATE
  SUMMARIZECOLUMNS(
          Store[Store]
          ,"Retail_Sales", 'All Measures'[Retail Sales]
          )
ORDER BY Store[Store]
When I add an RLS rule with TRUE(), as shown above, the query changes to a query similar to this:
EVALUATE
  FILTER(
      SUMMARIZECOLUMNS(
            Store[Store]
            ,"Retail_Sales", 'All Measures'[Retail Sales]
            )
      ,TRUE()
      )
ORDER BY Store[Store]
I enclosed the query within a FILTER() function and added TRUE() as the filter expression.
In the following examples, I will use CALCULATETABLE(), as writing the code is more efficient and flexible.
More on this in a bit.
Make it more complex
Next, I want to restrict access to all Stores containing the "Contoso T" String.
For this, I change the Expression in the Rule editor to the following:
CONTAINSSTRING('Store'[Store], "Contoso T")When testing the rule, I get the following result:

Testing the rule with a DAX query
It would be nice to test the outcome of such a rule with a DAX Query.
In this case, I use the following Query in DAX Studio to check the Result:
EVALUATE
  CALCULATETABLE(
    SUMMARIZECOLUMNS(
          Store[Store]
          ,"Retail_Sales", 'All Measures'[Retail Sales]
          )
    CONTAINSSTRING('Store'[Store], "Contoso T") = TRUE()
    )
ORDER BY Store[Store]
The inner part, with SUMMARIZECOLUMNS(), generates the output table.
In this case, I'm interested only in the list of the stores.
Then, I enclose the SUMMARIZECOLUMNS() call with CALCULATETABLE() to add a filter to the query.
In this case, I add the expression from the RLS rule, including an "= TRUE()" check.
The result is the following:

But what happens under the hood?
Let's look at the Storage Engine Query:

And what happens when I apply the RLS rule to this query?
I can apply an RLS rule from DAX Studio with a few clicks:

The Storage Engine query is the following:

The first query (Line 2) retrieves the list of all Stores.
The second query includes the RLS rule in the WHERE clause.
Instead of having the list matching Stores (According to the Filter), we see a cryptic line, which includes the RLS rule.
You can see that the result of the Storage Engine (SE) query still contains 309 Rows, like above, which is the number of all Stores + 3 rows. A hint why we have the discrepancy of 3 rows is in the text below the SE query: Estimated size: rows = 309
The actual number of rows returned may be indeed 306.
But this analysis shows that RLS rules are applied after the Storage Engine, as the query result contains only 21 rows: All Stores which start with "Contoso T".
This is important, as the Formula Engine (FE), which will compute the final result after the Storage Engine, is single-threaded and can use only one CPU Core.
While the SE is multi-threaded and can use multiple CPU cores.
Consequently, we must refrain from writing inefficient code into the RLS rule.
Combined Rules
Next, I want to combine two expressions:
- Only Stores starting with "Contoso T"
- Only Stores in Europe
To achieve this, I add a second expression to the Geography table using the simple editor:

When I switch to the DAX Editor, I get the following expression:

Notice the use of the strict equal operator.
Changing to the simple equal operator for your expression can be necessary.
This is the result when testing the rule:

The DAX query for this rule will look like this:

Now, let's add another level of complexity to the RLS rule:
I want to restrict access to the Stores which either:
-
The name of the Stores starts with "Contoso T" and are in Europe or
- The name of the Stores starts with "Contoso S" and are in North America
This time, I begin with the DAX query. This is the simpler way to develop and test the expression.
I take the first query and enclose it with the filter expression.
As I need to filter two tables (Store and Geography), I must use FILTER() and RELATED():
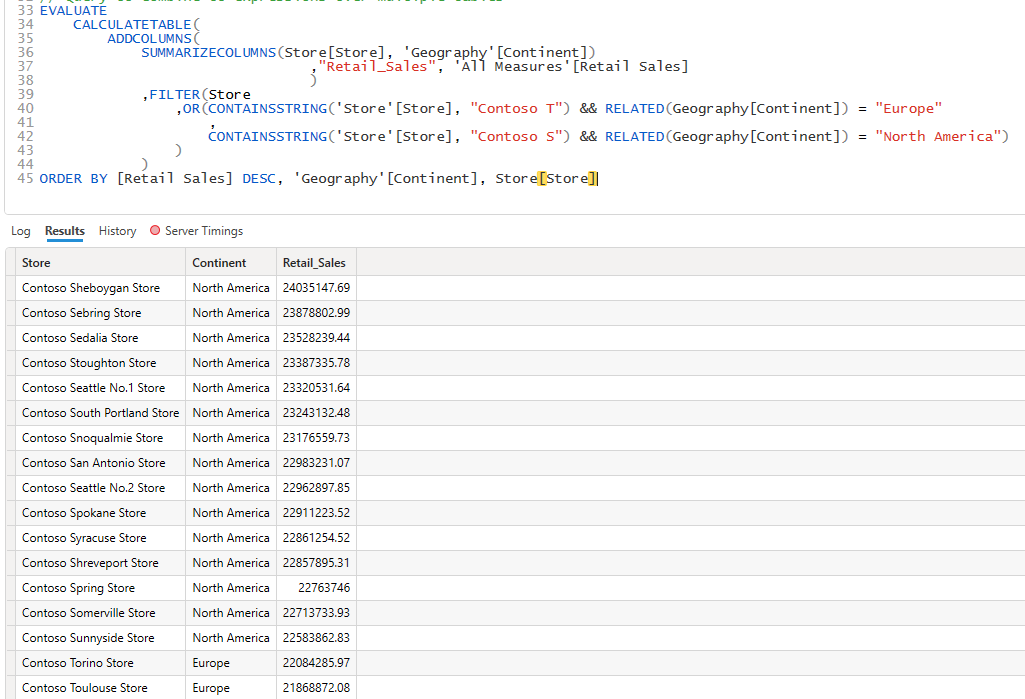
EVALUATE
  CALCULATETABLE(
    ADDCOLUMNS(
      SUMMARIZECOLUMNS(Store[Store], 'Geography'[Continent])
            ,"Retail_Sales", 'All Measures'[Retail Sales]
            )
    ,FILTER(Store
        ,OR(CONTAINSSTRING('Store'[Store], "Contoso T") && RELATED(Geography[Continent]) = "Europe"
          ,CONTAINSSTRING('Store'[Store], "Contoso S") && RELATED(Geography[Continent]) = "North America")
        )
    )
ORDER BY [Retail Sales] DESC, 'Geography'[Continent], Store[Store]
I need the RELATED() function as I use FILTER() to iterate through the Store table, and I need the Continent column from the Geography table.
As the Geography table is on the one side of the Relationship, I can use RELATED() to get the Continent column.
This is the result:
Next, we must translate this filter to an RLS rule.
For the RLS rule, we can remove the FILTER() function, as the RLS rule inherently works as a filter.

Note that I removed the expression from the "Geography" table.
When I test this rule in Power Bi, I get the following result, which corresponds to the result from the DAX query:

For testing the RLS rule, for example, when you want only to get the list of filtered stores, you can write a simple query with just the FILTER() function:

Configure access based on User login
Until now, we looked at static RLS rules.
But most of the time, we need rules based on the User-Login.
To achieve this, we need a table that maps the user to the rows the user needs access to.
For example, a table like this:

After adding the table to the data model, we need to add a Relationship between the new table and the "Geography" table:

The relationship between the new "Geography Access" table and the "Geography" table must be configured correctly.
After adding the Relationship, Power BI configures it as a 1:n Relationship, with the "Geography" table on the one side and the Filter flowing from the "Geography" table to "Geography Access".
But we want to filter the "Geography" table based on an RLS rule (a filter) on "Geography Access". For this reason, we must change the cross-filter direction to both:

In addition, we must set the flag on "Apply security filter in both directions," as Power BI ignores the cross-filter direction setting when applying RLS rules.
Now we can add the RLS rule:

Remember to remove any filter expression on the Store table before adding this rule.
When testing the RLS rule, I get this:

To find out what happens, let's go back to the RLS rule editor and change the view for the Rule to DAX:

The simple RLS rule editor doesn't recognize DAX functions and adds them as Text to filter.
We must change the expression to this:

Now the result is as expected:

The Card on the top-left corner of the report page contains a Measure with the USERPRINCIPALNAME() function to ensure that the correct user is active during the test.
I can even test an RLS rule using another user:
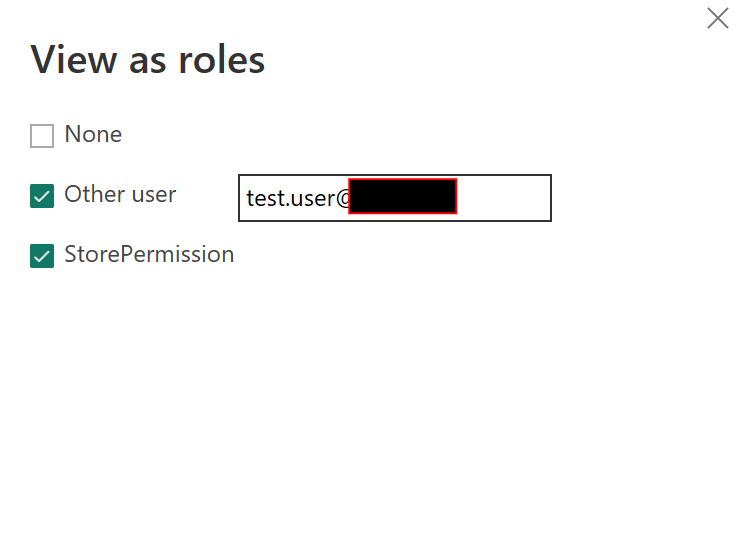
It's funny that this user doesn't need to exist. It only has to be contained in the "Geography Access" list.
Here is the result of the test:

In the yellow line on top, you can see the active user during the test.
Conclusion
I showed you how to create elementary RLS rules and how to test them.
Then I added more complexity and analyzed the effects of RLS rules on the underlying Storage engine.
We have seen that the Formula Engine processes part of the RLS rule. Therefore, we must write efficient code in the RLS rules.
Knowing how to test RLS rules before implementing them in the data model is very important.
It is much easier to understand wrong results by understanding how the rule is applied to the data model.
Finally, I added dynamic user-based RLS rules to the model.
These rules are more difficult to test in a DAX query, as you must know which data each user can access to write the correct test query to validate the result.
I hope I have given you some hints on simplifying your life with the RLS feature in Power BI.

References
You can find a list of Security features in Power BI in this Article:
You can find a simple explanation about Row Level Security in Power BI on the Power BI (Now Fabric) Community page: Row-level security (RLS) with Power BI – Power BI | Microsoft Learn.
I can recommend this article by Nikola Ilic, where you can get a starting point about RLS:
The Ultimate Guide to Row-Level and Object-Level Security in Power BI
Another good introductory article on Row-Level-Security in Power BI by Elias Nordlinder:
Visit my Stories List for more information about the FILTER() function and how to analyze DAX Query with DAX Studio.
I use the Contoso sample dataset, like in my previous articles. You can download the ContosoRetailDW Dataset for free from Microsoft here.
The Contoso Data can be freely used under the MIT License, as described here.
You can support my work, which I do during my free time, through
https://buymeacoffee.com/salvatorecagliari
Or scan this QR Code:

Any support is greatly appreciated and helps me find more time to create more content for you.
Thank you a lot.
