An Intuitive Guide to Integrate SQL and Python for Data Science
In my recent work experience, I have discovered the remarkable synergy between two essential data management and analysis tools: Python and SQL.
If you are already immersed in the world of Data Science, you have likely realized that Python is indispensable for any data scientist, thanks to its extensive ecosystem of libraries for tasks, such as data manipulation, data visualization, and modelling.
While Python shines in its ability to handle complex data processes with few lines of code, SQL remains unmatched when efficiently managing structured data, executing queries, and performing operations for reading and modifying data.
In this article, I will show a practical use case that highlights the benefits of integrating Python and SQL to work with MySQL data. Let's get started!
Table of contents:
- What is a relational database?
- Setting up MySQL
- Start to play with MySQL Workbench
- Connect Python to MySQL Database
- Common SQL Operations using Python
- Data Analysis with Python
What is a relational database?

A relational database is a type of database that organizes data into a collection of interrelated tables. The tables store data in a structured way, where each tables consists of rows and columns. The tables are connected through keys, which are special fields used to establish and maintain relationships between data.
There are two types of keys: primary keys and foreign keys.
The primary key is a unique identifier for each row in a table. For example, a table called "Rental", the Rental ID serves as the primary key to identify each film rental.
Different tables can have relationships with each other through foreign keys. For example, in the "Rental" table, Customer ID is the foreign key to link each customer to the corresponding information, such as name and surname.
The Structured Query Language (SQL) is the standard language to communicate with a relational database. It allows to perform operations, such as selecting specific records, joining tables and updating data.
Setting up MySQL

MySQL is the most popular open-source database management system that allows to access, manage and manipulate relational data stored in databases. It can be installed on Windows. For the other operating systems, check this documentation.
In the case of Windows, download the larger installer. Be careful to include MySQL Server, MySQL Workbench, MySQL Router and the samples that are needed to follow the tutorial.
In most of the old tutorials and courses, they recommend downloading the developer default option, but it's not present anymore. Since in this tutorial, I am going to a sample database provided by MySQL, it can speed up the set up process by choosing the full option.

After you need to enter the password for your account. Save it somewhere because you'll need it later. In the rest of the process, leave the default options.

Start to play with MySQL Workbench
Before going further, it's crucial to have a fast overview of the databases in the tool MySQL Workbench.
In this tutorial, we are going to use the Sakila sample database, that we have already installed in the previous step. It contains data regarding the DVD rental store and examples of tables are actor, film, rental and so on.
First, you need to connect to the Database. Press Database from the menu and click "Connect to Database". After, a window will open and you just need to press the "OK" button.

Finally, you can see the Sakila database from the navigator with the tables within it. This development environment allows to automatize operations, like selecting, creating and updating tables. For example, we can see the first rows of the table film by right-clicking the table and selecting the first option.

This is just a quick demonstration of how you can deal with tables within a database without writing SQL code. Visualizing tables can be fine, but modifying huge amounts of data Programming can ease life.
Connect Python to MySQL Database
Once you have installed MySQL, it's time to show an example of handling the database from Visual Studio Code. There is a library that needs to be installed:
Python">! pip install mysql-connector-pythonThis library is important to access and interact with the MySQL database. As before, the first step is to establish a connection with the connect() method:
import pandas as pd
from mysql.connector import connect

conf_params = {
    'host':'localhost',
    'user':'root',
    'password':'',
    'database':'sakila'
}

db = connect(
    host=conf_params['host'],
    user=conf_params['user'],
    password=conf_params['password'],
    database=conf_params['database']
)

my_cursor = db.cursor()
In this way, the cursor object allows us to execute the queries later.
Common SQL Operations using Python
Once the connection has been established, there are different possible operations allowed:
- Select rows from table
- Insert rows
- Delete rows
- Update existing rows
- Create and Delete table
We are going to perform these common SQL operations using two Python libraries, MySQL to manage MySQL database and Pandas to visualize the data.
- Select rows from table
To select all the records from the table film, we need to write and execute the query.
query_select = """
    SELECT *
    from sakila.actor
"""

my_cursor.execute(query_select)
db.commit()

actors = pd.read_sql(query_select, db)
actors.tail()
This is the dataframe obtained from the query:

These are the same results we have obtained before in the MySQL workbench. Differently from before, we can interact with the tables programmatically.
In the next sections, we are going to modify the table/dataframe. To avoid repeating the same lines of code, there is this function defined to check the changes in the dataframe:
def check_change():
    query_select = """
        SELECT *
        from sakila.actor
    """
    actors = pd.read_sql(query_select, db)
    return actors
This function will be continuously used to check before and after the modifications of our data.
2. Insert rows
Let's suppose that we want to add a new row in the table. This is possible using the execute() method:
val = (int(actors.actor_id.max()+1),'BRAD','PITT',
       pd.Timestamp('2024-09-18 04:34:33'))

insert_command = f"
  INSERT INTO sakila.actor (actor_id,first_name,last_name,last_update)
  VALUES {val}
"

my_cursor.execute(query_insert)
db.commit()

print(my_cursor.rowcount, "record inserted.")

actors = check_change()
actors.tail()
This is the output dataframe obtained after adding the row:

It's worth noticing that there is a new row added at the end of the table. Instead, if we want to add more than a single row, we need to use executemany() method:
values = [
    (int(actors.actor_id.max()+1),'BEN','AFFLECK',pd.Timestamp('2024-09-18 04:34:33')),
    (int(actors.actor_id.max()+2),'JENNIFER','LOPEZ',pd.Timestamp('2024-09-18 04:34:33'))]

insert_command = "
  INSERT INTO sakila.actor (actor_id,first_name,last_name,last_update)
  VALUES (%s,%s,%s,%s)
"

my_cursor.executemany(insert_command,values)
db.commit()

print(my_cursor.rowcount, "record inserted.")

actors = check_change()
actors.tail()
We take a look again at the new table:

Well, now we have other two records appended at the bottom of the dataframe, the famous couple of actors, that are divorcing recently.
3. Delete rows
As we have added rows, we can delete them as well. The structure of the code is very similar, except for the DELETE statement to remove the records:
delete_command = "
    DELETE FROM sakila.actor
    WHERE first_name =  'JENNIFER' and last_name = 'LOPEZ'
"

my_cursor.execute(delete_command)

db.commit()

print(my_cursor.rowcount, "record deleted.")

actors = check_change()
actors.tail()
Well, now the record regarding Jennifer Lopez is out of the game. When you write this type of command, be careful to filter well the table, otherwise, a lot of rows will be removed.
4. Update existing rows
Suppose one of the actors in the database, Ben Affleck, wants to change his surname. So, we need to update it accordingly:
update_command = """
    UPDATE sakila.actor
    SET last_name = 'FEATHERINGTON'
    WHERE first_name = 'BEN' and last_name = 'AFFLECK'
"""

my_cursor.execute(update_command)
db.commit()

print(my_cursor.rowcount, "record updated.")

actors = check_change()
actors.tail()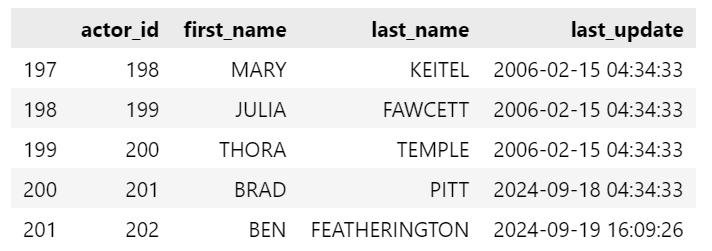
Now, we have changed the surname of Ben Affleck to Featherigton.
5. Create and Drop table
Our last example consists of the creation of a table recording the oscars of the actors:
query_update = """
    CREATE TABLE oscar
    (oscar_id INT,
    oscar_type VARCHAR(255),
    actor_id INT,
    film_id INT
    )
"""

my_cursor.execute(query_update)
db.commit()
To check the existence of the new table, we try to select all the rows from the oscars table:
query_select = """
        SELECT *
        from sakila.oscar
    """
oscars = pd.read_sql(query_select, db)
oscars
As you can see, there are no rows since we just defined the structure of the table. The addition of rows needs to be followed after creating the table.
It can also happen that you defined badly the table and you prefer to drop it to define it better later. The Python syntax is always the same, the only change is the DROP TABLE statement:
drop_command = """
    DROP TABLE sakila.oscar
"""

my_cursor.execute(drop_command)
db.commit()

query_select = """
        SELECT *
        from sakila.oscar
    """
oscars = pd.read_sql(query_select, db)
oscars
It will just return an error saying that that table doesn't exist:
DatabaseError: Execution failed on sql '
        SELECT *
        from sakila.oscar
    ': 1146 (42S02): Table 'sakila.oscar' doesn't exist
That's it! We have mastered the MySQL library to perform the top SQL commands.
Data Analysis with Python
After performing common operations that are done usually with SQL, we can immerse ourselves in a typical analysis that can be done by integrating both Python and SQL.
First, we want to join different tables to display the most frequently rented movies in descending order
import matplotlib.pyplot as plt
import seaborn as sns

#Display the most frequently rented movies in descending order.

query_select = """
    SELECT f.title, COUNT(f.title) as 'Rentals', f.description, f.release_year, f.rating
    FROM sakila.film f
    INNER JOIN sakila.inventory i ON f.film_id = i.film_id
    INNER JOIN sakila.rental r ON i.inventory_id = r.inventory_id
    GROUP by title, description, release_year, rating
    ORDER BY rentals desc;
"""

film_rentals = pd.read_sql(query_select, db)
film_rentals.head()
Now, we can see an overview of the dataset we have obtained by merging different tables. Next, let's show information to understand our data:
film_rentals.info()This is the output:
RangeIndex: 958 entries, 0 to 957
Data columns (total 5 columns):
 #   Column        Non-Null Count  Dtype
---  ------        --------------  -----
 0   title         958 non-null    object
 1   Rentals       958 non-null    int64
 2   description   958 non-null    object
 3   release_year  958 non-null    int64
 4   rating        958 non-null    object
dtypes: int64(2), object(3)
memory usage: 37.5+ KB
From the output, we can observe that there are no null values, there are 958 rows and 5 columns, and the type of each column.
In addition, we can also check the variability of the numeric columns:
film_rentals.describe()
That's quite insightful! We can see that the films were released only in 2006, so we are not interested in looking at data within the time. Instead, we can focus on looking at how the number of rentals varies and investigate the difference between several types of ratings.
plt.figure(figsize=(8, 6))
sns.boxplot(x='rating', y='Rentals', data=film_rentals, palette='Set2')

plt.xlabel('Rating Type')
plt.ylabel('Number of Rentals')
plt.title('Boxplot of Number of Rentals by Rating Type')

plt.show()
From the boxplots, we can note that the higher numbers of rented films belong to the rating PG (Parental guidance suggested) and rating PG-13 (Parents strongly cautioned for children under 13) and R (Under 17 requires accompanying parent or adult guardian). Therefore, it seems that the rentals related to films with a rating NC-17 (No Children Under 17 Admitted) had greater variability than other rating types.
This is just a taste of what analysis you can do using Python after extracting the data using an SQL select.
Final thoughts
This was an introductory guide for getting started dealing with MySQL databases using Python.
We have also explored the benefits of integrating Python and SQL – two complementary tools that help to solve different types of problems.
The Python library used in this tutorial, MySQL Connector, is specifically designed for working with MySQL databases.
If you need to manage data stored on popular cloud platforms like Amazon or Azure, pymssql is a great alternative for working with SQL Server databases. Its methods are quite similar to those shown in this article, so understanding the basic concepts shouldn't be too difficult.
Have you tried using other libraries for working with databases? Feel free to share your experiences in the comments!
If you still have questions, especially regarding SQL syntax, which wasn't deeply covered here due to the focus on Python's capabilities, check out the resources listed at the end of the article.
Thanks for reading! Have a nice day!
Useful Resources:
