Using DeepFace for Face Recognition
In my previous article on Face Detection, I discussed how you can make use of OpenCV to detect faces in your webcam:
Face Detection using Python – the Precursor to Face Recognition
Detecting faces is the first step that you usually perform, followed by face recognition.
Face recognition is the process in which you match a human face from a digital image or a video frame against a database of faces.
There are several deep learning models that you can use to perform face recognition, but all these requires you to have some knowledge of neural networks and you also need to train them using your own dataset. For people who wanted to perform face recognition but do not want to go into the details of how neural network works, there is an API that really simplifies face recognition – Deepface.
What is DeepFace?
DeepFace is a lightweight face recognition and facial attribute analysis (age, gender, emotion and race) framework (API) for python. It is essentially a wrapper for state-of-the-art models trained to recognize faces. It can use the following pre-trained models:
- VGG-Face (default)
- Google FaceNet
- OpenFace
- Facebook DeepFace
- DeepID
- ArcFace
- Dlib
- SFace
In short, DeepFace allows you to use pre-trained models to recognize your own set of faces, without requiring you to create your own model and train it.
In this article, I will walk you through some of the cool features of DeepFace and how you can incorporate face recognition in your own project.
Ethical Considerations for Face Detection/Recognition
While the ability to recognize faces is definitely cool, it certainly has a lot of ethical implications. There are several concerns that you need to take note before you get too ahead of yourself when implementing facial recognition into your projects. Concerns such as privacy (face detection can be used to track people's movements without their consent), bias (face recognition can be biased towards individual of different race, gender, or age), and misuse (faces captured may be used for other illegal uses or malicious purposes). So while this article focuses on the technical capability for face recognition, you should consider carefully the moral and ethical implications before you implement it in your work.
Here are some low-risk projects where face recognition can be implemented:
- Attendance tracking – you can use face recognition in schools or workplace to take attendance.
- Personalization – using face recognition to personalize services. A good example is for entertainment services such as recommending specific TV shows based on a user's watching history.
- Security – use of face recognition to unlock non-critical systems, such as smartphones and computers.
However, using face recognition in certain applications has severe moral implications. Here are some examples:
- Law enforcement – while face recognition can be useful for law enforcement, there are some serious concerns about its inaccuracies and biases.
- Surveillance – face recognition technologies have been used in some countries for monitoring and tracking its citizens, particularly dissidents. Some companies also uses face recognition to monitor employees' productivity, which is a direct infringement of their privacies.
Here are some articles that you can read to learn more about the legal and moral concerns of face recognition:
- Facial Recognition in the United States: Privacy Concerns and Legal Developments – https://www.asisonline.org/security-management-magazine/monthly-issues/security-technology/archive/2021/december/facial-recognition-in-the-us-privacy-concerns-and-legal-developments/
- Privacy and security issues associated with facial recognition software – https://www.techrepublic.com/article/privacy-and-security-issues-associated-with-facial-recognition-software/
- 10 reasons to be concerned about facial recognition technology – https://www.privacycompliancehub.com/gdpr-resources/10-reasons-to-be-concerned-about-facial-recognition-technology/
Installing DeepFace
Installing DeepFace is relatively easy – if you have a Mac. For Windows, it requires a bit of work.
I will walk you through the steps for installing DeepFace on both macOS and windows.
For macOS
For macOS, simply run the following commands in Jupyter Notebook to install cmake, dlib, and then deepface:
!pip install cmake
!pip install dlib
!pip install deepface
Once this is done, you are ready to use DeepFace.
For Windows
For Windows, you need to perform a number of steps:
- Download CMake from https://cmake.org/download/ and run the installer.
Make sure to add path environment variable to its bin eg: C:/ProgramFiles/cmake/bin during the installation process
- Download Visual Studio Build Tools from https://visualstudio.microsoft.com/visual-cpp-build-tools/ and run the installer.
- Check the C++ built tools and click Install:

The above step will take a bit of time. Go for your break now.
- Finally, run the following commands in Jupyter Notebook:
!pip install dlib
!pip install deepface
Once this is done, you are ready to use DeepFace.
Using DeepFace
To use DeepFace, import it:
from deepface import DeepFaceI am using Jupyter Notebook for this article.
Preparing the Images
I am going to download and prepare a few images so that I can test it with DeepFace. First, download the following image of Keanu Reeves and save it to the same directory as your Jupyter Notebook:

Then, create a variable named image1 and assign it the filename of the image:
image1 = 'Keanu_Reeves_(crop_and_levels)_(cropped).jpg'Likewise, do it for the following images:

image2 = 'Reunião_com_o_ator_norte-americano_Keanu_Reeves_(46806576944)_(cropped).jpg'
image3 = 'Jet_Li_2009_(cropped).jpg'
image4 = 'Denzel_Washington_2018.jpg'
image5 = 'Smiling_girl.jpg'Comparing Faces
Let's now use DeepFace to compare two images to see if they contain the faces of the same person. For this, you use the verify() function:
DeepFace.verify(img1_path = image1,  # Keanu Reeves
                img2_path = image2)  # Keanu Reeves
The first time you run DeepFace, it will download the weights of the pre-trained model (by default it uses the VGG-Face model) to your computer:

Once the weights have been downloaded, DeepFace will return a result that looks like this:
{'verified': True,
 'distance': 0.17842618501190277,
 'threshold': 0.4,
 'model': 'VGG-Face',
 'detector_backend': 'opencv',
 'similarity_metric': 'cosine',
 'facial_areas': {'img1': {'x': 42, 'y': 61, 'w': 144, 'h': 144},
  'img2': {'x': 73, 'y': 57, 'w': 103, 'h': 103}},
 'time': 0.27}
The value of the verified key indicates if the two faces are the same. The value of the distance key is the distance between the two face vectors (the smaller the value the more similar are the two faces). The value of the threshold key sets the threshold in which the distance value will be interpreted – a value of less than 0.4 will cause True to be set for the verified key. The facial_areas key contains the positions of the faces in the two images.
Let's try to compare another two images – image1 and image3:
DeepFace.verify(img1_path = image1,   # Keanu Reeves
                img2_path = image3)   # Jet Li
Not surprisingly, DeepFace detected that the two faces are different:
{'verified': False,
 'distance': 0.4034869302977028,
 'threshold': 0.4,
 'model': 'VGG-Face',
 'detector_backend': 'opencv',
 'similarity_metric': 'cosine',
 'facial_areas': {'img1': {'x': 42, 'y': 61, 'w': 144, 'h': 144},
  'img2': {'x': 20, 'y': 49, 'w': 164, 'h': 164}},
 'time': 0.27}
Embeddings
Embeddings are multi-dimensional vectors representing the facial images. DeepFace allows you to find the embeddings using the represent() function:
embeddings = DeepFace.represent(img_path = image1)  # Keanu Reeves
embeddings
The embeddings for image1 is as follows:
[{'embedding': [0.00948819238692522,
   -0.010876820422708988,
   -0.0013923903461545706,
   0.01534500066190958,
   ...
   -0.014694824814796448,
   -0.015208861790597439,
   0.005312952678650618,
   ...],
  'facial_area': {'x': 42, 'y': 61, 'w': 144, 'h': 144}}]
Depending on which pre-trained model you used for DeepFace, the size of the value of theembedding key varies. For VGG-Face, the the facial image is represented as a 2622-dimension vector. What is more fun is the value of the facial_area key, which contains the location of the face in the image.
The following code snippet displays the image of Keanu Reeves (image1) and the rectangle drawn around the area that detected his face:
import matplotlib.pyplot as plt
import matplotlib.patches as patches
from PIL import Image

im = Image.open(image1)
fig, ax = plt.subplots()

# display the image
ax.imshow(im)

# draw a rectangle around the face
face_coord = embeddings[0]['facial_area']
rect = patches.Rectangle((face_coord['x'], face_coord['y']),
                         face_coord['w'], face_coord['h'],
                         linewidth = 2,
                         edgecolor = 'r',
                         facecolor = 'none')

# add the patch to the axes
ax.add_patch(rect)
Finding a Face from a Folder of Faces
Perhaps the most exciting feature of DeepFace is its ability for you to take an image and compare it with a set of images located in a folder. DeepFace will then tell you which of the images are most identical to the one you have supplied. This is essentially Face Recognition.
To see how powerful this feature is, I created a new folder named Faces in the same folder as my Jupyter Notebook and populated it with some images of Jet Li and Keanu Reeves:

I then call the find() function and pass it image1:
DeepFace.find(img_path = image1,    # the image to compare against
              db_path = "Faces",    # folder containing all the images
              enforce_detection = False)[0]
If the
find()function discovers that an image in the Faces folder does not contain any face, it will raise an exception. To prevent this from happening, set theenforce_detectionparameter toFalse.
The find() function returns a list of Pandas DataFrames, so you need to use the 0 index to retrieve the first DataFrame:
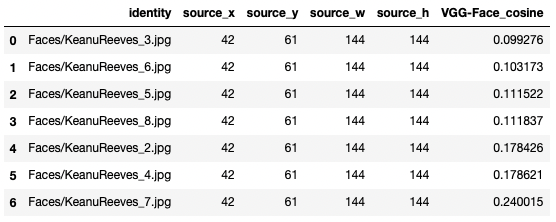
The dataframe contains a list of image filenames that most closely resembles the image that you are searching. In this example, the top match is KeanuReeves_3.jpg:

The dataframe is sorted based on VGG-Face_cosine (the smaller the value, the closer the match).
Note that when you call the find() function for the first time, a representations file named representations_vgg_face.pkl is created and stored in the Faces folder. If you were to add new images to the Faces folder, remember to delete the representations_vgg_face.pkl file.
With the find() function, you can essentially perform face recognition without training any model – just create a folder containing the faces you want to recognize (each individual should have as many images as possible) and voila, you have a face recognition model!
Analyzing Faces
Besides comparing faces and finding a face from a folder of faces, DeepFace also allows you to analyze the various features of a face, such as age, gender, emotion, and race:
DeepFace.analyze(img_path = image4,
                 actions = ["age", "gender", "emotion", "race"])
The above statement analyzes the image of Denzel Washington (image4) and it quite accurately predicted that the face in the image is:
- feeling sad
- a black man
Here's the result returned by the analyze() function:
[{'age': 35,
  'region': {'x': 31, 'y': 46, 'w': 117, 'h': 117},
  'gender': {'Woman': 0.015357557276729494, 'Man': 99.98464584350586},
  'dominant_gender': 'Man',
  'emotion': {'angry': 0.3038950626725033,
   'disgust': 3.667220231060474e-11,
   'fear': 2.3939014472247897,
   'happy': 1.2440780556642484e-05,
   'sad': 87.49081939349405,
   'surprise': 6.846103949403675e-05,
   'neutral': 9.81130493418037},
  'dominant_emotion': 'sad',
  'race': {'asian': 7.334453304675418,
   'indian': 3.1661530981155095,
   'black': 85.50387534522267,
   'white': 0.09932484836949994,
   'middle eastern': 0.03912873741168454,
   'latino hispanic': 3.8570622418559934},
  'dominant_race': 'black'}]
Let's try analyzing another image, this time with the image of a smiling girl (image5):
DeepFace.analyze(img_path = image5,
                 actions = ["age", "gender", "emotion", "race"])
The result is pretty accurate:
[{'age': 26,
  'region': {'x': 377, 'y': 140, 'w': 558, 'h': 558},
  'gender': {'Woman': 99.66641068458557, 'Man': 0.3335847519338131},
  'dominant_gender': 'Woman',
  'emotion': {'angry': 1.31229280062393e-10,
   'disgust': 2.1887400676449618e-26,
   'fear': 3.8267408134914985e-22,
   'happy': 99.99999403953517,
   'sad': 2.6514247764822096e-14,
   'surprise': 2.245952144279152e-17,
   'neutral': 6.961274993922523e-06},
  'dominant_emotion': 'happy',
  'race': {'asian': 3.0054475969609733,
   'indian': 4.536693711482729,
   'black': 0.7851633247927815,
   'white': 41.17996289491211,
   'middle eastern': 23.323961892600284,
   'latino hispanic': 27.168768902870287},
  'dominant_race': 'white'}]
Changing Pre-trained Models
If you want to change the underlying pre-trained model used by DeepFace, you can specify the model you want to use using the model_name parameter in the verify() function:
models = ["VGG-Face", "Facenet", "OpenFace", "DeepFace", "ArcFace"]
DeepFace.verify(image1,
                image2,
                model_name = models[1])  # change to Facenet
The weights for the selected model will now be downloaded onto your computer.
The same goes for the represent() function:
embeddings = DeepFace.represent(img_path = image1,
                                model_name = models[1])
And the find() function:
DeepFace.find(img_path = image1,
              db_path = "Faces",
              model_name = models[1],
              enforce_detection = False)[0]
If you like reading my articles and that it helped your career/study, please consider signing up as a Medium member. It is $5 a month, and it gives you unlimited access to all the articles (including mine) on Medium. If you sign up using the following link, I will earn a small commission (at no additional cost to you). Your support means that I will be able to devote more time on writing articles like this.
Summary
Using DeepFace makes it very easy for you to perform face recognition – there is no need for explicit training, and all you need to do is to put the images of faces into a specific folder and DeepFace will do the hard work of recognizing a specific face. The downside of DeepFace is that it takes a bit of time to return a result. If you want to use DeepFace for realtime face recognition, it might not be the best choice. However, there are still a lot of applications that you can build using DeepFace. If you are using DeepFace for your current projects, be sure to share with us how you are using DeepFace, or how you intend to use it.
