Deploying Falcon-7B Into Production
A step-by-step tutorial

Background
By now, we've seen the capabilities of ChatGPT and what it has to offer. However, for enterprise use, closed-source models like ChatGPT may pose a risk as enterprises have no control over their data. OpenAI claims that user data is not stored or used for training models, but there is no guarantee that data will not be leaked in some way.
To combat some of the issues related to closed-source models, researchers are rushing to build open-source LLMs that rival models like ChatGPT. With open-source models, enterprises can host the models themselves in a secure cloud environment, mitigating the risk of data leakage. On top of that, you get full transparency in the inner workings of the model, which helps build more trust with AI in general.
With the recent advancements in open-source LLMs, it's tempting to try out new models and see how they stack up against closed-source models like ChatGPT.
However, running open-source models today poses significant barriers. It's so much easier to call the ChatGPT API than to figure out how to run an open-source LLM.
In this article, my goal is to break these barriers by showing how you can run open-source models like the Falcon-7B model in the cloud in a production-like setting. We will be able to access these models via an API endpoint similar to ChatGPT.
Challenges
One of the significant challenges to running open-source models is the lack of computing resources. Even a "small" model like the Falcon 7B requires a GPU to run.
To solve this problem, we can leverage the GPUs in the cloud. But this poses another challenge. How do we containerize our LLM? How do we enable GPU support? Enabling GPU support can be tricky because it requires knowledge of CUDA. Working with CUDA can be a pain in the neck because you have to figure out how to install the proper CUDA dependencies and which versions are compatible.
So, to avoid the CUDA death trap, many companies have created solutions to easily containerize models while enabling GPU support. For this blog post, we'll be using an open-source tool called Truss to help us easily containerize our LLM without much hassle.
Truss allows developers to easily containerize models built using any framework.
Why use Truss?
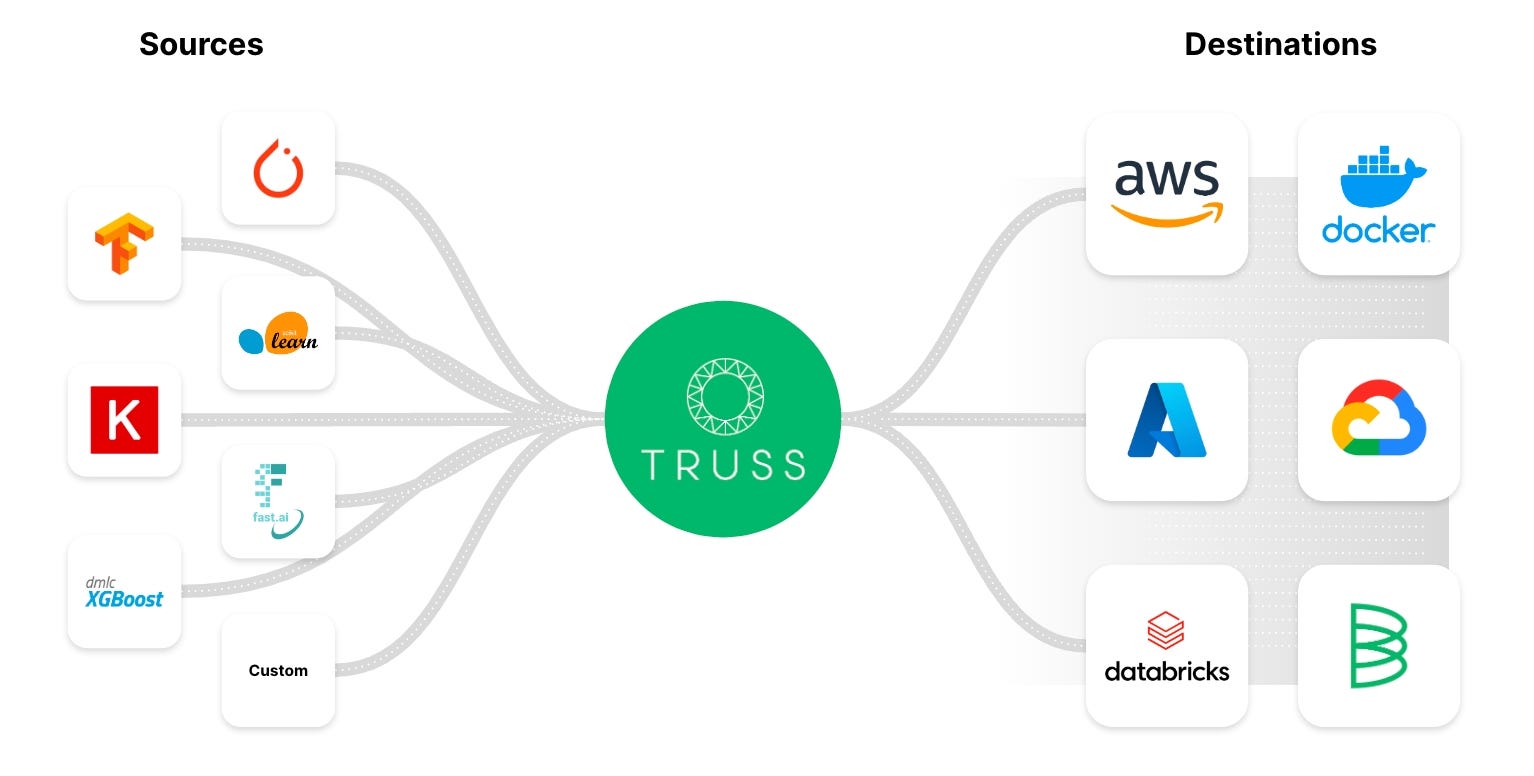
Truss has a lot of useful features right out of the box such as:
- Turning your Python model into a microservice with a production-ready API endpoint
- Freezing dependencies via Docker
- Supporting inference on GPUs
- Simple pre-processing and post-processing for the model
- Easy and secure secrets management
I've used Truss before to deploy machine learning models and the process is quite smooth and simple. Truss automatically creates your dockerfile and manages Python dependencies. All we have to do is provide the code for our model.

The main reason we want to use a tool like Truss is that it becomes much easier to deploy our model with GPU support.
Note: I have not received any sponsorship from Baseten to promote their content nor am I associated with them in any way. I'm under no influence in any way from Baseten or Truss to write this article. I simply found their open source project to be cool and useful.
The plan
Here's what I'll be covering in this blog post:
- Set up Falcon 7B locally using Truss
- Run the model locally if you have a GPU(I have an RTX 3080)
- Containerize the model and run it using docker
- Create a GPU-enabled Kubernetes cluster in Google Cloud to run our model
Don't worry if you don't have a GPU for step 2, you will still be able to run the model in the cloud.
Here is the Github repo containing the code if you want to follow along:
Let's get started!
Step 1: Falcon 7B local setup using Truss
First, we'll need to create a project with Python version ≥ 3.8
We'll be downloading the model from hugging face and packaging it using Truss. Here are the dependencies we'll need to install:
pip install trussInside your Python project create a script called main.py . This is a temporary script we'll be using to work with truss.
Next, we'll set up our Truss package by running the following command in the terminal:
truss init falcon_7b_trussIf you're prompted to create a new truss, press ‘y'. Once that's complete, you should see a new directory called falcon_7b_truss . Inside that directory, there will be some autogenerated files and folders. There are a couple of things we need to fill out: model.py which is nested under the package model and config.yaml .
├── falcon_7b_truss
│   ├── config.yaml
│   ├── data
│   ├── examples.yaml
│   ├── model
│   │   ├── __init__.py
│   │   └── model.py
│   └── packages
└── main.py
As I mentioned previously, Truss only needs our model's code, it takes care of all the other things automatically. We'll be writing the code inside model.py , but it has to be written in a specific format.
Truss expects each model to support at least three functions: __init__ , load , and predict .
__init__is primarily used for creating class variablesloadis where we'll download the model from hugging facepredictis where we'll call our model
Here's the full code for model.py :
import torch
from transformers import AutoTokenizer, AutoModelForCausalLM, pipeline
from typing import Dict

MODEL_NAME = "tiiuae/falcon-7b-instruct"
DEFAULT_MAX_LENGTH = 128

class Model:
    def __init__(self, data_dir: str, config: Dict, **kwargs) -> None:
        self._data_dir = data_dir
        self._config = config
        self.device = "cuda" if torch.cuda.is_available() else "cpu"
        print("THE DEVICE INFERENCE IS RUNNING ON IS: ", self.device)
        self.tokenizer = None
        self.pipeline = None

    def load(self):
        self.tokenizer = AutoTokenizer.from_pretrained(MODEL_NAME)
        model_8bit = AutoModelForCausalLM.from_pretrained(
            MODEL_NAME,
            device_map="auto",
            load_in_8bit=True,
            trust_remote_code=True)

        self.pipeline = pipeline(
            "text-generation",
            model=model_8bit,
            tokenizer=self.tokenizer,
            torch_dtype=torch.bfloat16,
            trust_remote_code=True,
            device_map="auto",
        )

    def predict(self, request: Dict) -> Dict:
        with torch.no_grad():
            try:
                prompt = request.pop("prompt")
                data = self.pipeline(
                    prompt,
                    eos_token_id=self.tokenizer.eos_token_id,
                    max_length=DEFAULT_MAX_LENGTH,
                    **request
                )[0]
                return {"data": data}

            except Exception as exc:
                return {"status": "error", "data": None, "message": str(exc)}
What's happening here:
MODEL_NAMEis the model we'll be using which in our case is thefalcon-7b-instructmodel- Inside
load, we download the model from hugging face in 8bit. The reason we want 8bit is that the model uses significantly less memory on our GPU when quantized. - Also, loading the model in 8-bit is necessary if you want to run the model locally on a GPU with less than 13GB VRAM.
- The
predictfunction accepts a JSON request as a parameter and calls the model usingself.pipeline. Thetorch.no_gradtells Pytorch that we are in inference mode, not training mode.
Cool! That's all we need to setup our model.
Step 2: Running the model locally (Optional)
If you have an Nvidia GPU with more than 8GB of VRAM you will be able to run this model locally.
If not, feel free to move on to the next step.
We'll need to download some more dependencies to run the model locally. Before you download the dependencies you need to make sure you have CUDA and the right CUDA drivers installed.
Because we're trying to run the model locally, Truss won't be able to help us manage the CUDA madness.
pip install transformers
pip install torch
pip install peft
pip install bitsandbytes
pip install einops
pip install scipy
Next, inside main.py the script we created outside of the falcon_7b_truss directory, we need to load our truss.
Here is the code for main.py :
import truss
from pathlib import Path
import requests

tr = truss.load("./falcon_7b_truss")
output = tr.predict({"prompt": "Hi there how are you?"})
print(output)
What's happening here:
- If you recall, the
falcon_7b_trussdirectory was created by truss. We can load that entire package, including the model and dependencies usingtruss.load - Once, we've loaded our package we can simply call the
predictmethod to get the models output
Run main.py to get the output from the model.
This model files are ~15 GB in size so it might take 5–10 minutes to download the model. After running the script you should see an output like this:
{'data': {'generated_text': "Hi there how are you?nI'm doing well. I'm in the middle of a move, so I'm a bit tired. I'm also a bit overwhelmed. I'm not sure how to get started. I'm not sure what I'm doing. I'm not sure if I'm doing it right. I'm not sure if I'm doing it wrong. I'm not sure if I'm doing it at all.nI'm not sure if I'm doing it right. I'm not sure if I'm doing it wrong. I"}}Step 3: Containerizing the model using docker
Usually, when people containerize a model, they take the model binary and the Python dependencies and wrap it all up using a Flask or Fast API server.
A lot of this is boilerplate and we don't want to do it ourselves. Truss will take care of it. We've already provided the model, Truss will create the server, so the only thing left to do is provide the Python dependencies.
The config.yaml holds the configuration for our model. This is where we can add the dependencies for our model. The config file already comes with most of the things we need, but we'll need to add a few things.
Here is what you need to add to config.yaml:
apply_library_patches: true
bundled_packages_dir: packages
data_dir: data
description: null
environment_variables: {}
examples_filename: examples.yaml
external_package_dirs: []
input_type: Any
live_reload: false
model_class_filename: model.py
model_class_name: Model
model_framework: custom
model_metadata: {}
model_module_dir: model
model_name: Falcon-7B
model_type: custom
python_version: py39
requirements:
- torch
- peft
- sentencepiece
- accelerate
- bitsandbytes
- einops
- scipy
- git+https://github.com/huggingface/transformers.git
resources:
  use_gpu: true
  cpu: "3"
  memory: 14Gi
secrets: {}
spec_version: '2.0'
system_packages: []
So the main thing we added is the requirements . All of the dependencies listed are required to download and run the model.
The other important thing we added is the resources . The use_gpu: true is essential, because this tells Truss to create a Dockerfile for us with GPU support enabled.
That's it for the configuration.
Next up, we'll containerize our model. If you don't know how to containerize a model using Docker, don't worry Truss has got you covered.
Inside the main.py file, we'll tell Truss to package everything together. Here is the code you need:
import truss
from pathlib import Path
import requests

tr = truss.load("./falcon_7b_truss")
command = tr.docker_build_setup(build_dir=Path("./falcon_7b_truss"))
print(command)
What's happening:
- First, we load our
falcon_7b_truss - Next, the
docker_build_setupfunction handles all of the complicated stuff like creating the Dockerfile and setting up the Fast API server. - If you take a look at your
falcon_7b_trussdirectory, you'll see that many more files got generated. We don't need to worry about how these files work because it will all get managed behind the scene. - At the end of the run, we get a docker command to build our docker image:
docker build falcon_7b_truss -t falcon-7b-model:latest

If you want to build the docker image go ahead and run the build command. The image is ~ 9 GB in size , so it might take a while to build. If you don't want to build it but want to follow along you can use my image: htrivedi05/truss-falcon-7b:latest .
If you're building the image yourself, you will need to tag it and push it to docker hub so that our containers in the cloud can pull the image. Here are the commands you will need to run once the image is built:
docker tag falcon-7b-model /falcon-7b-model docker push /falcon-7b-model Awesome! We are ready to run our model in the cloud!
(Optional steps below for running the image locally with a GPU)
If you have an Nvidia GPU and want to run your containerized model locally with GPU support, you need to ensure docker is configured to use your GPU.
Open up a terminal and run the following commands:
distribution=$(. /etc/os-release;echo $ID$VERSION_ID) && curl -s -L https://nvidia.github.io/nvidia-docker/gpgkey | sudo apt-key add - && curl -s -L https://nvidia.github.io/nvidia-docker/$distribution/nvidia-docker.list | sudo tee /etc/apt/sources.list.d/nvidia-docker.listapt-get update
apt-get install -y nvidia-docker2sudo systemctl restart dockerNow that your docker has been configured to access your GPU, here is how to run your container:
docker run --gpus all -d -p 8080:8080 falcon-7b-modelAgain, it will take a while to download the model. To make sure everything is working correctly you can check the container logs and you should see "THE DEVICE INFERENCE IS RUNNING ON IS: cuda".
You can call the model via an API endpoint like so:
import requests

data = {"prompt": "Hi there, how's it going?"}
res = requests.post("http://127.0.0.1:8080/v1/models/model:predict", json=data)
print(res.json())
Step 4: Deploying the model into production
I'm using the word "production" quite loosely here. We're going to run our model in kubernetes where it can easily scale and handle variable amounts of traffic.
With that being said, there are a TON of configurations kubernetes has such as network policies, storage, config maps, load balancing, secrets management, etc.
Even though kubernetes is built to "scale" and run "production" workloads, a lot of the production-level configurations you need don't come out of the box. Covering those advanced kubernetes topics is out of the scope of this article and takes away from what we're trying to accomplish here. So for this blog post, we'll create a minimal cluster without all the bells and whistles.
Without further ado, let's create our cluster!
Prerequisites:
- Have a Google Cloud Account with a project
- Have the gcloud CLI installed on your machine
- Make sure you have enough quota to run a GPU enabled machine. You can check your quotas under IAM & Admin.

Creating our GKE cluster
We'll be using Google's kubernetes engine to create and manage our cluster. Ok, time for some IMPORTANT information:
Google's kubernetes engine is NOT free. Google will not allow us to use a powerful GPU free of charge. With that being said, we are creating a single-node cluster with a less powerful GPU. It should not cost you more than $1–$2 for this experiment.
Here's the configuration for the kubernetes cluster we'll be running:
- 1 node, standard kubernetes cluster (not autopilot)
- 1 Nvidia T4 GPU
- n1-standard-4 machine (4 vCPU, 15 GB memory)
- All of this will run on a spot instance
Note: If you're in another region and don't have access to the exact same resources, feel free to make modifications.
Steps for creating the cluster:
- Head over to google cloud console and search for the service called Kubernetes Engine

- Click the CREATE button
- Make sure you are creating a standard cluster, not an autopilot cluster. It should say Create a kubernetes cluster at the top.
- Cluster basics
- Inside the cluster basics tab, we don't want to change much. Just give your cluster a name. You don't need to change the zone or control plane.

- Click on the default-pool tab and change the number of nodes to 1
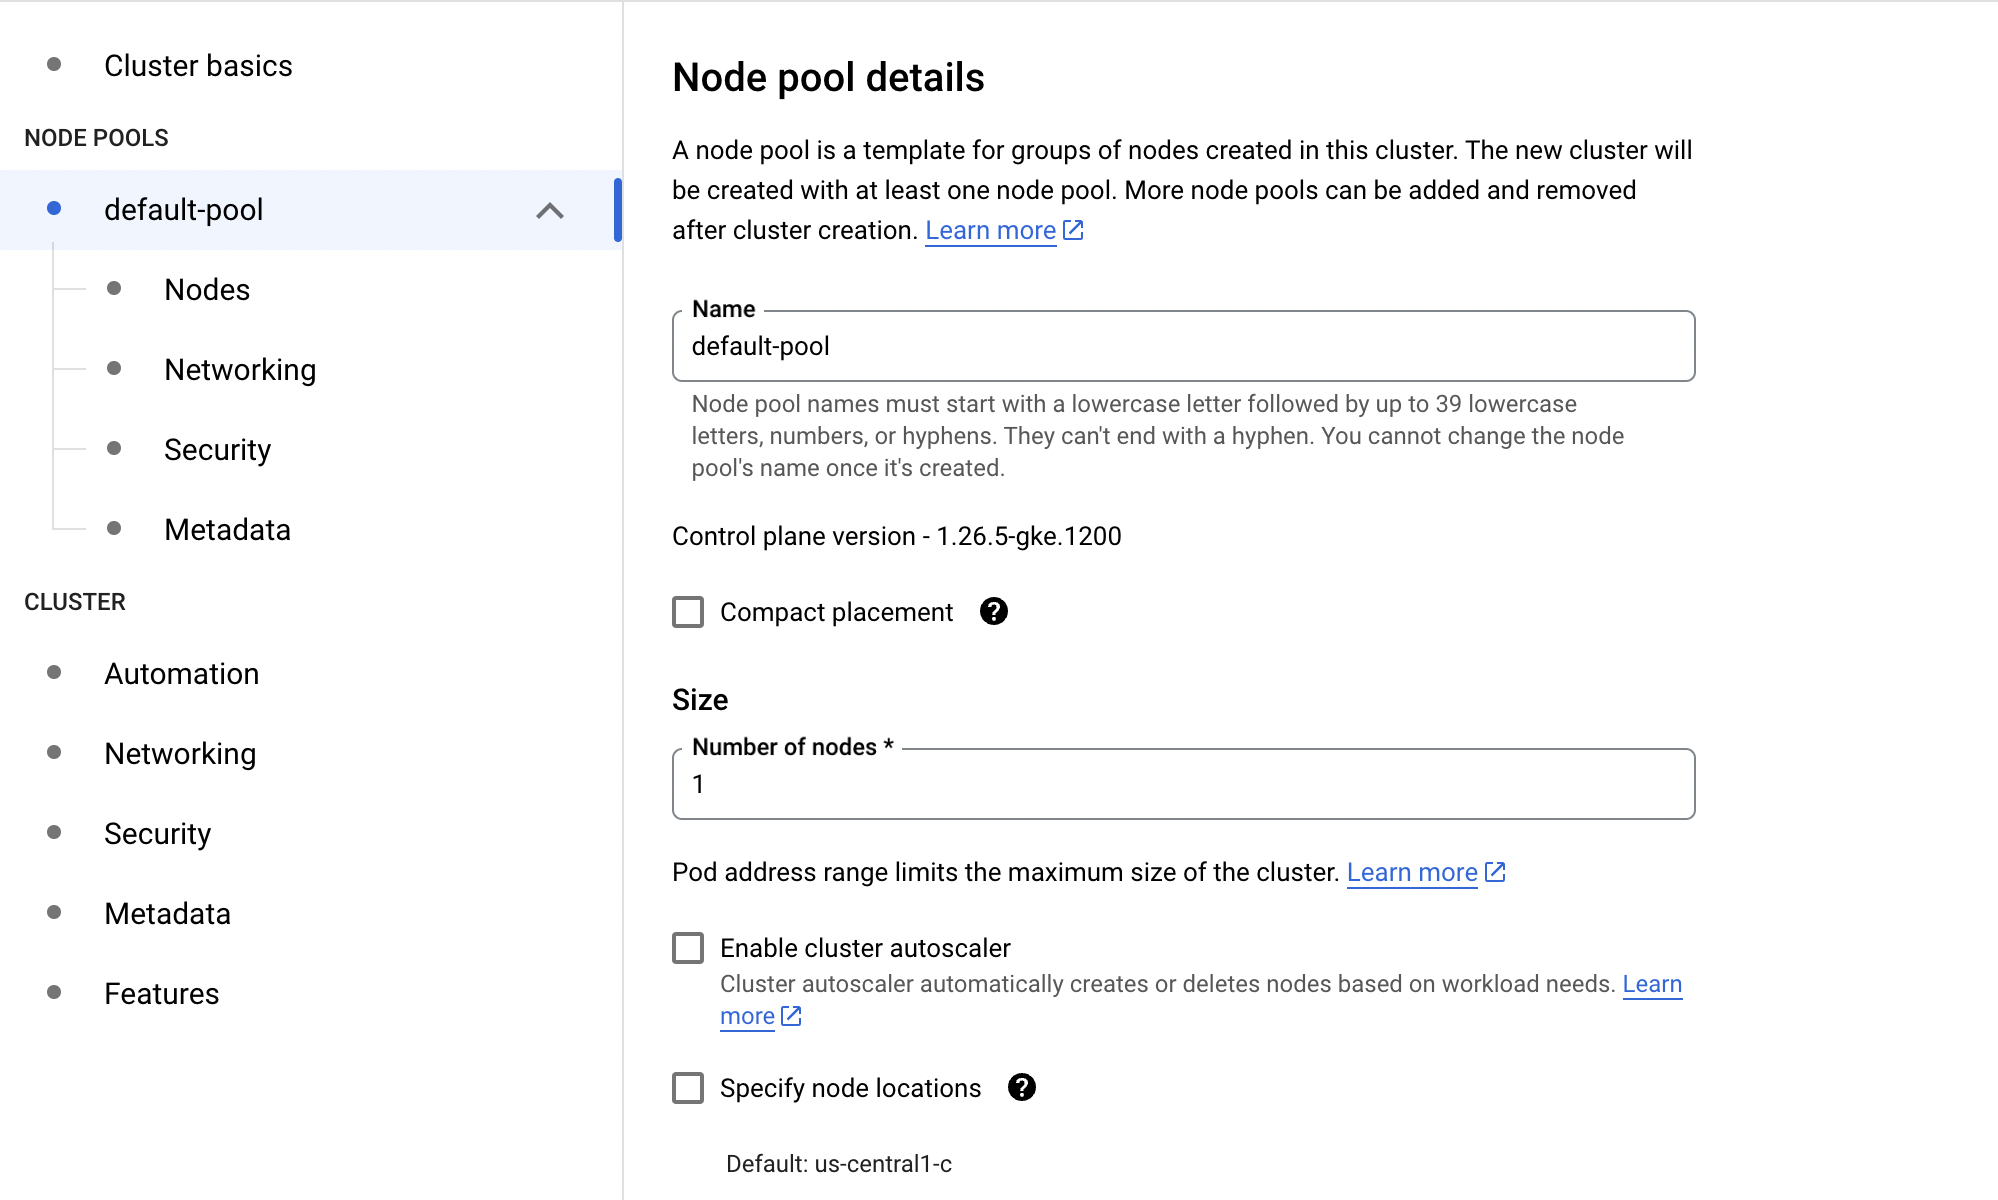
- Under default-pool click the Nodes tab in the left-hand sidebar
- Change the Machine Configuration from General Purpose to GPU
- Select the Nvidia T4 as the GPU type and set 1 for the quantity
- Enable GPU timeshare (even though we won't be using this feature)
- Set the Max shared clients per GPU to 8
- For the Machine Type, select the n1-standard-4 (4 vCPU, 15 GB memory)
- Change the Boot disk size to 50
- Scroll down to the very bottom and check-mark where it says: Enable nodes on spot VMs


Here is a screen-shot of the estimated price I got for this cluster:

Once you've configured the cluster go ahead and create it.
It'll take a few minutes for Google to set everything up. After your cluster is up and running, we need to connect to it. Open up your terminal and run the following commands:
gcloud config set compute/zone us-central1-cgcloud container clusters get-credentials gpu-cluster-1If you used a different zone of cluster name, update those accordingly. To check that we're connected run this command:
kubectl get nodesYou should see 1 node appear in your terminal. Even though our cluster has a GPU, it's missing some Nvidia drivers which we'll have to install. Thankfully, installing them is easy. Run the following command to install the drivers:
kubectl apply -f https://raw.githubusercontent.com/GoogleCloudPlatform/container-engine-accelerators/master/nvidia-driver-installer/cos/daemonset-preloaded.yamlSweet! We are finally ready to deploy our model.
Deploying the model
To deploy our model onto our cluster we need to create a kubernetes deployment. A kubernetes deployment allows us to manage instances of our containerized model. I won't go too deep into kubernetes or how to write yaml files as it's out of scope.
You need to create a file called truss-falcon-deployment.yaml . Open that file and paste in the following contents:
apiVersion: apps/v1
kind: Deployment
metadata:
  name: truss-falcon-7b
  namespace: default
spec:
  replicas: 1
  selector:
    matchLabels:
      component: truss-falcon-7b-layer
  template:
    metadata:
      labels:
        component: truss-falcon-7b-layer
    spec:
      containers:
      - name: truss-falcon-7b-container
        image: /falcon-7b-model:latest
        ports:
          - containerPort: 8080
        resources:
          limits:
            nvidia.com/gpu: 1
---
apiVersion: v1
kind: Service
metadata:
  name: truss-falcon-7b-service
  namespace: default
spec:
  type: ClusterIP
  selector:
    component: truss-falcon-7b-layer
  ports:
  - port: 8080
    protocol: TCP
    targetPort: 8080
What's happening:
- We are telling kubernetes that we want to create pods with our
falcon-7b-modelimage. Make sure you replacehtrivedi05/truss-falcon-7b:latest - We are enabling GPU access for our container by setting a resource limit
nvidia.com/gpu: 1. This tells kubernetes to request only one GPU for our container - To interact with our model, we need to create a kubernetes service that will run on port 8080
Create the deployment by running the following command in your terminal:
kubectl create -f truss-falcon-deployment.yamlIf you run the command:
kubectl get deploymentsYou should see something like this:
NAME              READY   UP-TO-DATE   AVAILABLE   AGE
truss-falcon-7b   0/1     1            0           8s
It will take a few minutes for the deployment to change to the ready state. Remember the model has to get downloaded from hugging face each time the container restarts. You can check the progress of your container by running the following command:
kubectl get podskubectl logs truss-falcon-7b-8fbb476f4-bggtsChange the pod name accordingly.
There are a few things you want to look for in the logs:
- Look for the print statement THE DEVICE INFERENCE IS RUNNING ON IS: cuda. This confirms that our container is properly connected to the GPU.
- Next, you should see some print statements regarding the model files being downloaded
Downloading (...)model.bin.index.json: 100%|██████████| 16.9k/16.9k [00:00<00:00, 1.92MB/s]
Downloading (...)l-00001-of-00002.bin: 100%|██████████| 9.95G/9.95G [02:37<00:00, 63.1MB/s]
Downloading (...)l-00002-of-00002.bin: 100%|██████████| 4.48G/4.48G [01:04<00:00, 69.2MB/s]
Downloading shards: 100%|██████████| 2/2 [03:42<00:00, 111.31s/it][01:04<00:00, 71.3MB/s]- Once the model is downloaded and Truss has created the microservice you should see the following output at the end of your logs:
{"asctime": "2023-06-29 21:40:40,646", "levelname": "INFO", "message": "Completed model.load() execution in 330588 ms"}From this message, we can confirm the model is loaded and ready for inference.
Model inference
We can't call the model directly, instead, we have to call the model's service
Run the following command to get the name of your service:
kubectl get svcOutput:
NAME                      TYPE        CLUSTER-IP   EXTERNAL-IP   PORT(S)    AGE
kubernetes                ClusterIP   10.80.0.1            443/TCP    46m
truss-falcon-7b-service   ClusterIP   10.80.1.96           8080/TCP   6m19s
The truss-falcon-7b-service is the one we want to call. To make the service accessible we need to port-forward it using the following command:
kubectl port-forward svc/truss-falcon-7b-service 8080Output:
Forwarding from 127.0.0.1:8080 -> 8080
Forwarding from [::1]:8080 -> 8080
Sweet, our model is available as a REST API endpoint at 127.0.0.1:8080 . Open up any python script such as main.py and run the following code:
import requests

data = {"prompt": "Whats the most interesting thing about a falcon?"}
res = requests.post("http://127.0.0.1:8080/v1/models/model:predict", json=data)
print(res.json())
Output:
{'data': {'generated_text': 'Whats the most interesting thing about a falcon?nFalcons are known for their incredible speed and agility in the air, as well as their impressive hunting skills. They are also known for their distinctive feathering, which can vary greatly depending on the species.'}}Whoo-hoo! We have successfully containerized our Falcon 7B model and deployed it as a microservice in production!
Feel free to play with different prompts to see what the model returns.
Winding down the cluster
Once you've had your fun messing with Falcon 7B you can delete your deployment by running this command:
kubectl delete -f truss-falcon-deployment.yamlNext, head over to the kubernetes engine in google cloud and delete the kubernetes cluster.
Note: All images unless otherwise noted are by the author
Conclusion
Running and managing a production-grade model like ChatGPT is not easy. However, with time the tooling will get better for developers to deploy their own model into the cloud.
In this blog post, we touched upon all the things needed to deploy an LLM into production at a basic level. We packaged the model using Truss, containerized it using Docker, and deployed it in the cloud using kubernetes. I know it's a lot to unpack and it wasn't the easiest thing to do in the world, but we did it anyway.
I hope you learned something interesting from this blog post. Thanks for reading!
Peace.
