How I Created a Kaggle-Like Platform for My Students Using Streamlit and How You Can Do It as Well

I love Kaggle and believe its contribution to disseminating Data Science and machine learning has been invaluable. As a fan of video games and gamification, I appreciate how Kaggle's ranking and points system encourages participants to improve their models through healthy, constructive competition. Kaggle has become so popular, that many instructors have incorporated Kaggle as part of their preferred tools to teach machine learning.
However, as a business school instructor who teaches some machine learning courses, I've found that using Kaggle as a tool to evaluate my students' final machine learning projects a little bit cumbersome. For starters, tracking students submissions is tedious and manual, and my students (please note that most of them are beginners to data science and programming in general), often find it discouraging to see the result of their efforts ranked at the bottom of the Kaggle ranking. Having said this, I think that it is important to acknowledge that Kaggle wasn't designed as a teaching tool, which explains its limitations in this context.
I've always dreamed of creating a mini version of Kaggle tailored for my students. This platform would allow me to replicate Kaggle's Gamification success and serve as a template for various subjects, including mathematical programming and combinatorial optimization. Initially, I felt discouraged by the effort required to build such a platform using typical web development frameworks available in python link Django or Flask.
Thankfully, I recently discovered Streamlit and its ability to interact with Google Sheets. In this article, I'll show you how to use Python, Streamlit, and Google Sheets to build a Kaggle-like web application to gamify your lessons. This app will let students log in with individual accounts, submit their solutions via CSV file uploads, score their solutions based on various machine learning metrics, and dynamically rank the submissions. Best of all, I'll explain how you can deploy this app for free.
Are you ready for some hands-on learning? Let's have a glimpse at our final app results…

Please note that this article might be lengthy. I aim to provide as much detail as possible, as I believe it could be beneficial for many teachers and professors who may not be as fluent in Python as a typical data science expert. If you are already a Python expert, you might prefer to skip the article and jump directly to the project's GitHub repository below:
GitHub – ceche1212/project_medium_kaggle_app: Repository for code for a kaggle like app that can be…
In the original project that I implemented with my students, the app featured three different machine learning sections: one for a regression problem, one for a binary classification problem, and one for a time series forecasting problem. For simplicity, this tutorial will focus on just one: a binary classification problem using the famous Pima diabetes dataset from the UC Irvine Machine Learning Repository. This dataset can also be downloaded from Kaggle.
Article index:
- Streamlit and Google Sheets
- App Design
- App Implementation and Deployment
- [1] – Setting up the project environment
- [2] – Setting up the google sheets database
- [3] — Data Privacy and Security
- [4] – Stablishing google sheets connection
- [5] – Libraries, state session variables and app config
- [6] – Login module
- [7] – Submit results module
- [8] – Dynamic ranking module
- [9] – submissions log module
- [10] – App deployment
- Real life results
- Conclusions
- References
Streamlit and Google sheets
Since version 1.28 in 2023, Streamlit allows users to connect to Google Sheets using their st.connection method. This method enables users to perform CRUD (create, read, update, and delete) operations using Google Sheets as a database. I learned about these features from a YouTube video made by Sven | Coding Is Fun. If you want to watch it, I'm leaving the link below.
I know what you're thinking, but before you get scared, hear me out. I understand that Excel (Google sheets) is not a database, and I agree with you. I also have nightmares about dealing with companies that use it as one. However, for the app we want to create, it's more than enough. It allows us to do everything we need, it's available online, it's private (since only we and the app can access it – unless someone is skilled enough to hack my Google account), and best of all, it's free. I do recognize this is an area for improvement, so I'm exploring the possibility of replacing Google Sheets with a connection to Supabase.

Before jumping straight into the implementation, it's worth examining the different modules the app must have, as well as the strategy we will follow for the implementation.
App design
The app we are going to create requires several processes. Firstly, we want to ensure that only our students have access to it, so we need a login system. Once users are logged in, they will need a module to submit their results. This requires a process to upload .csv files, verify that the files comply with the expected number of rows and requested columns, and then calculate an evaluation metric comparing the model predictions against the real test data. After this, the student should be able to see the classroom ranking and how their result compares to their peers. Finally, students should be able to see a log of all their submissions and their teammates' submissions, as this is a group project. Figure 3 showcases an overall view of the User Flow Diagram for our app.

App implementation
For this app, we will use Visual Studio Code. I strongly recommend creating a new project folder on your machine and opening Visual Studio Code from that folder. In my case, I decided to name the folder project_app_medium.
Setting up the project environment
I strongly recommend creating a virtual environment for each Streamlit app you make to avoid dependency conflicts with your other Python projects. After creating and activating your virtual environment, we need to install the following libraries.
pandas == 1.5.3
numpy == 1.26.4
matplotlib
streamlit
streamlit_option_menu
streamlit-extras
st-gsheets-connection
scikit-learn
To install the libraries, create a new text file and name it requirements.txt. Inside this blank text file, copy the libraries listed above and save it; we will need this file for the deployment of our app. Then, in the terminal, type the following command.
pip install -r requirements.txtThis command will install all the libraries listed in the requirements.txt file. Regarding the libraries we are using, we'll start with the classic "Mirepoix" of all data science projects: numpy, pandas, and matplotlib. We also need streamlit, as this is the base library that contains our framework. To extend the functionality of Streamlit, we will import some community-developed extensions such as streamlit_option_menu, which allows us to create simple sidebar menus, and streamlit-extras, which contains many customizable features. Additionally, we will use st-gsheets-connection to help us connect with Google Sheets. Please note that besides from the libraries above, we are also going to use hashlib for data security and protection. We are going to talk more about this when defining the details of database.
Throughout this tutorial, the following folder structure will be used, containing the following elements:
- .streamlit: This folder is where general Streamlit settings will be placed. Inside this folder we will store the secrets.toml file which will contain the Google Sheets API credentials needed to stablish a connection.
- app.py: The main Streamlit script.
- .gitignore: As its name suggest, files ignored by Git respectively, when making the project commit.
- logo.png (optional): Is an image that contains the logo of your company, to be displayed in top of the sidebar menu of our app. This is completely optional, in my case I am showing the logo of my company SAVILA GAMES.
- requirements.txt: Python dependencies to run the application.
- README.md: Project description.
project_app_medium/
│
├── .streamlit/                # General streamlit configuration
│   └── secrets.toml           # credentials for google sheets connection
├── app.py                     # App code
├── .gitignore
├── logo.png
├── requirements.txt           # Python dependencies
└── README.md
Setting up the google sheets database
Now that the environment is set up, we need to create the structure of the Google Sheets database. Open your Google Sheets app and create a new file; I named mine project_database. Then, proceed to create four tabs in the file. First, the "users" tab will contain all the user login credentials as well as the user group configuration. We will use the information from this tab to create the login module of the app. The tab should have the following column structure:
| email                  | name    | last name | password  | group    |
|------------------------|---------|-----------|-----------|----------|
| [email protected]   | John    | Doe       | Pass1234  | G1       |
| [email protected] | Jane    | Smith     | SecurePwd | G2       |
| [email protected] | Alex    | Jones     | MyPass789 | G1       |
| [email protected] | Emma    | Brown     | Emma12345 | G3       |
The next tab is the "log" tab. This tab will store the historical information of the submissions made by the users. It will also be used for the logic behind the ranking and the history submissions module of the app. The tab should have the following column structure:
| user                  | group     | time             | score |
|-----------------------|-----------|------------------|-------|
| john                  | G1        | 2024-06-17 10:00 | 0.85  |
| jane                  | G2        | 2024-06-17 11:00 | 0.72  |
| alex                  | G1        | 2024-06-17 12:00 | 0.90  |
| emma                  | G3        | 2024-06-17 13:00 | 0.65  |
The next tab will be the "test_data" tab. This tab will contain the real test y data used to evaluate the quality of the outputs submitted by the students. For this tutorial, we will split the Pima dataset and select the last 78 rows as the test dataset. The tab will have only one column containing the binary outcome data, with the following column structure:
| y          |
|------------|
| 0          |
| 1          |
| 1          |
| 0          |
The final tab we will create is the ‘configuration' tab. This tab will contain customizable parameters for the project, such as the deadline and the number of tries allowed per team per day (for reference, Kaggle allows five tries per team per day). This tab will enable us to dynamically change the project characteristics so that it can be easily adapted for use in different semesters. The "configuration" tab should have only one row and the following column structure:
| deadline              | max_per_day     |
|-----------------------|-----------------|
| 2024-07-01 23:59      | 5               |
You can download and view an example of the google sheets used in this tutorial project by clicking on the link below:
Data Privacy and Security
This is a small project that should be under our control and available only to our students. However, we must take precautions regarding data security, especially concerning the private information of our students. Imagine if, for some reason, the database gets leaked and falls into the hands of scammers or malicious entities. Having access to the names, emails, and passwords of our students could put them at risk. Therefore, we must ensure that, even if this happens, the data remains meaningless to these malevolent agents.
You might wonder if we can implement such a system at minimal cost. This is where hashing and the hashlib library come to the rescue.
Hashing is the process of converting input data into a fixed-size string of characters, typically a hash code, using a mathematical algorithm. It ensures data integrity, facilitates quick data retrieval, and securely stores sensitive information. What hashing algorithms are available? Fortunately, Python comes with hashlib, which includes several hashing algorithms:
- MD5 (
md5) - SHA-1 (
sha1) - SHA-224 (
sha224) - SHA-256 (
sha256) - SHA-384 (
sha384) - SHA-512 (
sha512) - SHA-3 family (
sha3_224,sha3_256,sha3_384,sha3_512) - BLAKE2 family (
blake2b,blake2s)
In our tutorial, we will use one of the available hashing algorithms in hashlib, specifically SHA-256, to transform the emails and passwords of our students into hashed codes. These hashed codes will be stored in the database. This way, even if the database is leaked, their data remains protected. The beauty of hashing lies in the fact that it is impractically hard to reverse the hashed code back to the original information through brute force. For instance, when the emails from the previous section are hashed using SHA-256, they become secure and unreadable.
# original emails

['[email protected]',
 '[email protected]',
 '[email protected]',
 '[email protected]']
# Hashed emails
['836f82db99121b3481011f16b49dfa5fbc714a0d1b1b9f784a1ebbbf5b39577f',
'f2d1f1c853fd1f4be1eb5060eaae93066c877d069473795e31db5e70c4880859',
'134318bc6349ad35d7e6b95123898eecdd437ad9b0c49cc4bdd66a811afc6909',
'd41d9b2f5671358bc6faf79b7435b4a9805a72d012f06d4804815328f39aed1e']Pretty difficult to decipher, don't you think? Below, you can find a function that, given a dataframe and a column, returns the hashed items of the specified column. This way you can hashed your database information and then store this values in the online google sheets database.
import hashlib

def hashit(df,column):

  return_list = []
  for data in df[column].tolist():
    hash_object = hashlib.sha256()
    hash_object.update(data.encode())
    return_list.append(hash_object.hexdigest())

  return return_list
You might be thinking, "But Luis, if they have the username and password, they can log in and impersonate one of the students." However, that situation is already covered. The students will log into the app using the emails and passwords provided by us, but they will input their real email and password on the login screen. The app will then take their login credentials, hash them using SHA-256, and verify the hashed output against the database.
So, if the database gets leaked and someone tries to use the information to log in, it won't work because their input will be hashed again, and it won't match the stored hash in the database. Let's look at the code and outputs below as an example.
password = "password"
hash_object.update(password.encode())
hash_password = hash_object.hexdigest()

print(hash_password)
print output:
"5377a16433598554e4a73a61195dbddea9d9956a22df04c3127c698b0dcdee48"Now if we rehash the already hashed password, as in the code below.
hash_object.update(hash_password.encode())
double_hash_password = hash_object.hexdigest()
print(double_hash_password)
We obtain the following:
"dfd4bb46c954f3802c7c2385b1a6b625b3cf0b4ce6adf59d3eec711c293994bb"You can easily verify that these two passwords definitely do not match. So you see hashing the previously hashed password produces something completely new.
Establishing google sheets connection
All the instructions required to establish the connection can be found in the GitHub repository of the st-gsheets-connection package. Let's follow the instructions together:
- Go to the Google Developers Console and create a new project. Right next to the Google Cloud icon, you will find a drop-down menu. Click on it and then click "Create New Project." Name your project as you wish; in my case, I am calling it
project_app_medium.

- Now, with the project selected, we need to activate two different APIs: Google Drive and Google Sheets. In the search bar at the top of the page, type "Google Drive," select the API, and then click on "Enable." Repeat the same steps for Google Sheets.

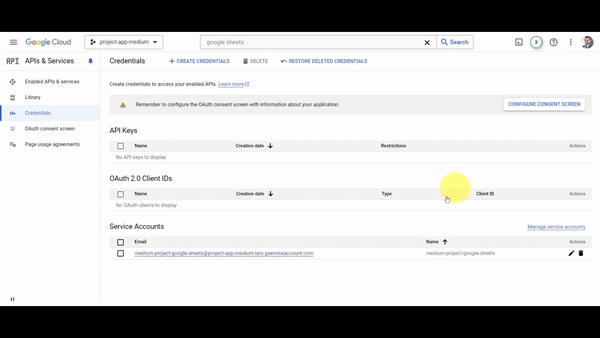
- With the project APIs enabled, we now need to create a technical user with access to them. Click on "Credentials," then click on "Create Credentials," and select the "Service Account" option. Assign a name to the technical user; in my case, I named it "
medium-project-google-sheets." Assign the "Editor" role to the technical user and finally click on "Done."

- With the technical user created, we now need to generate the credentials for this user. Click on the user you just created, then click on "Keys," then click on "Add Key," and select "Create New Key." Choose the JSON option and then click on "Done." This will automatically download a JSON file with all the credentials needed to use Google Sheets from our app.
- The last step is to store the credentials we just downloaded into a
secrets.tomlfile. If you haven't done so yet, create a new folder named.streamlitinside your project folder. Inside this folder, create a new file namedsecrets.toml. Open the file with the text editor of your choice (such as VS Code) and paste the information below into it.
# .streamlit/secrets.toml

[connections.gsheets]
spreadsheet = ""
worksheet = ""  # worksheet GID is used when using Public Spreadsheet URL, when usign service_account it will be picked as folder_id
type = ""  # leave empty when using Public Spreadsheet URL, when using service_account -> type = "service_account"
project_id = ""
private_key_id = ""
private_key = ""
client_email = ""
client_id = ""
auth_uri = ""
token_uri = ""
auth_provider_x509_cert_url = ""
client_x509_cert_url = "" - Substitute each element in the
secrets.tomlfile with the data from the JSON credentials file downloaded from Google. For the "spreadsheet" field, copy the URL of the Google Sheets database we created for the project. Next copy the "client_email" data from the JSON file, and then go to the Google Sheets database. In the spreadsheet, click on "Share," then paste the "client_email" into the text input field, make sure the "Editor" permission is selected, and click "Send."
With all these preparations complete, we are now ready to code the app.
Libraries, state session variables and app config
We are now going to proceed to import the required libraries for the app and create the session state variables that the app will use. Most of the session state variables will be associated with the login module. In Streamlit, session state variables store information across different interactions within a session. They help maintain state, such as user inputs or selections, between reruns of the app. Initially, these variables will be set to empty strings and will be updated as the app runs. For our specific app, we will create state variables for the username (using the student email as the username), the password, and the group to which the user belongs. We will also set the page title and the page icon (favicon) using the st.set_page_config() method from Streamlit.
import pandas as pd
import numpy as np
import matplotlib.pyplot as plt
import datetime
from pathlib import Path
import streamlit as st
from streamlit_option_menu import option_menu
from streamlit_extras.add_vertical_space import add_vertical_space
from streamlit_extras.stylable_container import stylable_container
from streamlit_gsheets import GSheetsConnection
from sklearn import metrics
import hashlib
if 'user_name' not in st.session_state:
st.session_state['user_name'] = ''
if 'student_name' not in st.session_state:
st.session_state['student_name'] = ''
if 'password' not in st.session_state:
st.session_state['password'] = ''
if 'group' not in st.session_state:
st.session_state['group'] = ''
st.set_page_config(
page_title='Medium Project',
page_icon='
