Mastering Synchronization Primitives in Python Asyncio: A Comprehensive Guide
PYTHON CONCURRENCY

This is one of my articles under the Python Concurrency series, and if you find it useful, you can read the rest from here.
Introduction
In this article, I will introduce why you need synchronization primitives in Python's asyncio and best practices for several synchronization primitives. And in the last part of the article, I will walk you through an example of synchronization primitives in action.
Why do you need synchronization primitives in asyncio
Anyone who has used Python multithreading knows that multiple threads share the same memory block. So when multiple threads perform non-atomic operations on the same area simultaneously, a thread-safe problem occurs.
Since asyncio runs on a single thread, does it not have similar thread-safe issues? The answer is no.
Concurrent tasks in asyncio are executed asynchronously, which means that there may be alternating execution of multiple tasks in time. A concurrency bug is triggered when one task accesses a particular memory area and waits for an IO operation to return, another task is also accessing this memory simultaneously.
To avoid such bugs, Python asyncio introduces a synchronization primitive feature similar to multithreading.
Also, to avoid too many tasks accessing a resource concurrently, asyncio's synchronization primitives provide the ability to protect the resource by limiting the number of tasks accessing it simultaneously.
Next, let's take a look at what synchronization primitives are available in asyncio.
Python asyncio's synchronization primitives
Lock
Before we introduce this API, let's look at a situation:
Suppose we have a concurrent task that needs a copy of the website data. It will first check if it's in the cache; if it is, it will fetch it from the cache, and if not, it will read it from the website.
Since it takes some time to read the website data to return and update the cache, when multiple concurrent tasks are executed at the same time, they all assume that this data does not exist in the cache and launch remote requests at the same time, as shown in the following code:
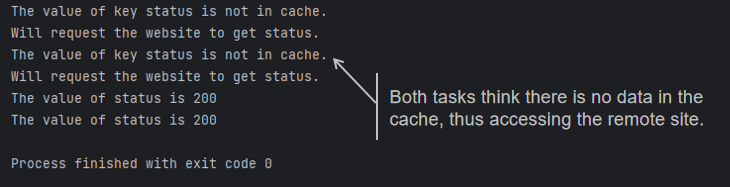
Which is not in line with our original design intent, so asyncio.Lock comes in handy.
We can check if there is data in the cache when concurrent tasks need to get a lock first, and other tasks that do not get a lock will wait. Until the task that gets the lock finishes updating the cache and releases the lock, the other tasks can continue to execute.
The entire flowchart is shown below:

Let's see how to write the code:

Problem solved, isn't it simple?
Semaphore
Sometimes, we need to access a resource with limited concurrent requests. For example, a particular database only allows five connections to be opened simultaneously. Or depending on the type of subscription you have, a web API only supports a certain number of concurrent requests at the same time.
In this case, you need to use asyncio.Semaphore. asyncio.Semaphore uses an internal counter that decrements by one each time a Semaphore lock is acquired until it reaches zero.
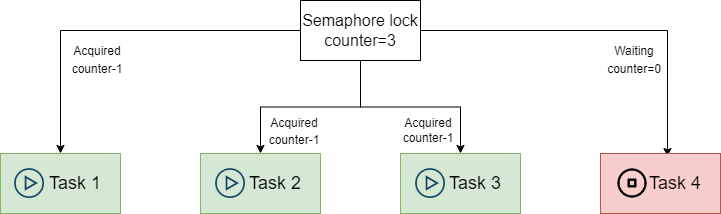
When the counter of asyncio.Semaphore is zero, other tasks that need the lock will wait. When calling the release method after the execution of other tasks, the counter will be increased by one. The waiting tasks can continue to execute.
The code example is as follows:
In this way, we can limit the number of connections that can be accessed concurrently.
BoundedSemaphore
Sometimes, due to code limitations, we can't use async with to manage the acquire and release of semaphore locks, so we might call acquire somewhere and release somewhere else.
What happens if we accidentally call the asyncio.Semaphore release method multiple times?
As the code shows, we are limited to running two tasks simultaneously, but because we called release more than once, we can run three tasks at the same time next time.
To solve this problem, we can use asyncio.BoundedSemaphore .
As we know from the source code, when calling the release, a ValueError is thrown if the counter value is greater than the value set during initialization:

Therefore, the problem is being solved.
Event
Event maintains an internal boolean variable as a flag. asyncio.Event has three common methods: wait, set, and clear.
When the task runs to event.wait(), the task is in wait. At this point, you can call event.set() to set the internal marker to True, and all the waiting tasks can continue to execute.
When the task is finished, you need to call event.clear() method to reset the value of the marker to False, to restore the event to its initial state, and you can continue to use the event next time.
Instead of the sample code, I will show you how to use Event to implement an event bus at the end of the article.
Condition
asyncio.Condition is similar to asyncio.Lock and asyncio.Event combined.
First, we will use async with to ensure that the condition lock is acquired, and then we call condition.wait() to release the condition lock and make the task wait temporarily. When condition.wait() passes, we regain the condition lock to ensure that only one task executes simultaneously.
While a task temporarily releases the lock and goes into wait by condition.wait(), another task can either async with to the condition lock and notify all waiting tasks to continue execution by the condition.notify_all() method.
The flowchart is shown below:

We can demonstrate the effect of asyncio.Condition with a piece of code:
Sometimes, we need asyncio.Condition to wait for a specific event to occur before proceeding to the next step. We can call the condition.wait_for() method and pass a method as an argument.
Each time condition.notify_all is called, condition.wait_for checks the result of the execution of the parameter method and ends the wait if it is True, or continues to wait if it is False.
We can demonstrate the effect of wait_for with an example. In the following code, we will simulate a database connection. Before executing the SQL statement, the code will check if the database connection is initialized and execute the query if the connection initialization is completed, or wait until the connection is completed initializing:
Some tips for using synchronization primitives
Remember to use timeout or cancelation when needed.
When using synchronization primitives, we are generally waiting for the completion of a specific IO operation. However, due to network fluctuations or other unknown reasons, the IO operation of a task may take longer than others.
In this case, we should set a timeout for the operation, so that when the execution time is too long, we can release the lock and allow other tasks to execute in time.
In another case, we may loop through a task. It may keep some tasks waiting in the background and prevent the program from ending properly. At this point, remember to use cancel to terminate the cyclic execution of the task.
Avoid using synchronization primitives or locking only the fewest resources
We all know that the advantage of asyncio is that a task can switch to another task to execute while waiting for IO to return.
But an asyncio task often contains both IO-bound operations and CPU-bound operations. If we lock too much code on the task, it will not be able to switch to another task in time, which will affect the performance.
Therefore, if not necessary, try not to use synchronization primitives or only lock the least amount of resources.
To avoid some other competitive locking situations
There is no RLock in asyncio, so don't use locks in recursive code.
As with multithreading, asyncio also has the possibility of deadlocks, so try to avoid using multiple locks simultaneously.
Advanced Techniques in Action: asyncio-based Event Bus
After the introduction earlier in the article, I believe you have a clear understanding of how to use asyncio's synchronization primitives properly.
Next, I will teach you how to use the synchronization primitives in real projects by taking you through the implementation of an event bus.
As usual, the first step as an architect is to design the EventBus API.
Since EventBus communicates using strings and internally, I intend to use asyncio.Event to implement the events corresponding to each string, we'll start by implementing a _get_event method:
The on method will bind a callback function to a specific event:
The trigger method can manually trigger an event and pass in the corresponding data:
Finally, let's write a main method to test the effect of EventBus:
At the end of the main method, remember to use timeout to prevent the program from executing all the time, as I warned before.

As you can see, the code is executed as expected. Isn't it easy?
Conclusion
This article first introduced why Python asyncio needs synchronization primitives.
Then, I introduced the best practices for Lock, Semaphore, Event, and Condition, and gave some tips on how to use them correctly.
Finally, I have completed a small project with hands-on training on asyncio synchronization primitives, which I hope will help you better use synchronization primitives in real projects.
Feel free to comment, share, or discuss topics about asyncio with me.
You can get more knowledge about Python Concurrency through my list of articles:
This article was originally published at: https://www.dataleadsfuture.com/mastering-synchronization-primitives-in-python-asyncio-a-comprehensive-guide/
