Getting Started with the Dev Containers Extension
One of the main reasons that I fully moved my Development workflow to Visual Studio Code (VScode) was the Dev Containers extension. The Dev Containers extension provides a native integration of Docker and containers with VScode. It reduces the effort of setting up a dockerized environment and collaborating with others while using a container framework. This tutorial focuses on "getting started" with the Dev Containers extension. We will dive into the motivation for using the Dev Containers extension (and Docker) in your development workflow. In addition, we will review the steps to add a Dev Container template to a project and launch it inside a container.
In the following tutorials, we will explore the extension's core functionality and review the customization options.

By the end of this tutorial, you will know how to:
- Install the Dev Containers extension
- Add the Dev Containers settings file to a project
- Launch a project inside a containerized VScode session
Motivation
You cannot talk about the Dev Containers without discussing the main motivation for using it – Docker.
Docker
If I need to describe Docker in one word, it would be reproducibility.
Docker is a CI/CD tool that enables seamless code deployment from one environment to another (e.g., from dev to prod, etc.). By creating OS-level virtualization, an application and its dependencies can be packaged in a virtual container and shipped between different environments. The main advantages of using Docker within your development environment are:
- Reproducibility – Docker enables you to seamlessly package your code and its dependencies into a single container and develop code, test it, share it with others, and deploy it with a high level of consistency
- Collaboration – Docker solves the dependencies madness when a team of developers works together on a specific project. Having a unified environment saves a ton of time during the development step. For example, if one developer gets some error, it is easy for other developers to reproduce the error and help debug it
- Deployment – Docker simplifies the code shipment from the development environment to the production
While Docker has a high learning curve, it has long-term benefits, as it simplifies the code development and deployment process.
VScode and the Dev Containers Extension
Vscode is a general-purpose free code editor developed by Microsoft. It can be run locally on Windows, macOS, and Linux OSs or on a cloud environment. The main advantages of using VScode as your IDE are:
- Multi-languages—VScode supports JavaScript, TypeScript, and Node.js out of the box and has various extensions that enable running other programming languages such as Python, C++, C#, Go, etc.
- Extensions – VScode has a large community support that builds and maintains a variety of extensions that extend the editor's capabilities and functionality. That includes extensions that support programming languages (such as Python, R, and Julia), plugs-in that enable connection with external applications (Docker, Postgres, etc.), and other applications
- Git integration – VScode has built-in integration with Git
- Docker integration – VScode supports development inside a containers
The Dev Containers extension provides a native integration of containers with VScode. It simplifies the process of setting up a dockerized environment and enables users to isolate the development environment from the default VScode setting fully.
General Architecture
When spinning a session with the Dev Containers, it launches a new VScode session inside a container, where:
- The
devcontainer.jsonfile defines the VScode environment settings. This includes the container details, the list of extensions to install, VScode customization settings, etc. - The containerized VScode session is fully isolated from the regular VScode settings. The
settings.jsonenables you to modify the installed extensions' default settings - By default, the Dev Containers extension mounts the local folder to the containerized session.
- You can mount additional folders with the
devcontainer.jsonfile
The mounting of the main folder to the container is a great feature that enables you to write and execute code inside the container while saving it locally.
In the next tutorials, we will dive into more details about the different customization options with the
devcontainer.jsonfile, such as mounting additional volumes, setting extensions, etc.
The below diagram demonstrates the general architecture of the extension. The blue rectangle represents the regular VScode session. Once we launch the session with the extension, it will use the devcontainer.json and settings.json to set the containerized VScode session and mount the local folder into the container (yellow rectangle).

The new session (yellow rectangle) settings are fully isolated from the main VScode settings (blue rectangle) and reproducible.
Prerequisites
Before getting started, let's review the general requirements for following this tutorial. To set up the Dev Containers extension, you will need the following:
- VScode
- Docker Desktop
- Docker Hub
If you already have those requirements set on your machine, you can skip to the next section.
Docker Desktop is required if you are using macOS or Windows OS, as it provides a virtualization layer to run the Docker Engine. To install the Docker Desktop, go to the Docker website and follow the installation instructions (see the screenshot below).

Linux OS can run natively Docker Engine and does not require Docker Desktop. To set up Docker Engine on Linux OSs, follow the instructions on this link
VScode is a Microsoft open-source integrated development environment (IDE). To install VScode, go to the VScode website and follow the installation instructions (see the screenshot below).

Last but not least, you will need to set up a Docker Hub account and log in from the CLI. Docker Hub is a container registry that has a similar functionality as GitHub for code, and it is used to store and share images. While there are other container registries (most are enterprise-level), the most common is Docker Hub, which has a free version. We will use Docker Hub throughout the tutorial to pull different images and set up the containerized environment with the Dev Container extension. To register and create a free account, go to the Docker Hub website and follow the registration instructions.

After installing Docker Desktop and setting account on Docker Hub, open Docker Desktop to launch the Docker Engine, and from the command line, log in to Docker Hub:
docker loginYou will have to enter your username and password, and you should expect the following output if the login is successful:
Login with your Docker ID to push and pull images from Docker Hub. If you don't have a Docker ID, head over to https://hub.docker.com to create one.
Username: rkrispin
Password:
Login Succeeded

Logging in with your password grants your terminal complete access to your account.
For better security, log in with a limited-privilege personal access token. Learn more at https://docs.docker.com/go/access-tokens/
Note: Docker Hub is completely public (for the free tier). Any image you push and store there will be available for all other users. Regardless if your container registry is public or not, NEVER store credentials, passwords, or any other sensitive information on your Docker images.
#
Once we have the Docker Desktop and Engine up and we log in to the Docker Hub, we can launch VScode and start setting up the Dev Containers extension.
Installing the Dev Containers Extension
Installing the Dev Containers in VScode is straightforward. Open the VScode extension menu (marked in purple on the screenshot below), and search for Dev Containers in the search bar. It should pop up as the first option (marked in yellow). Open the extension and click the Install button (marked in green).

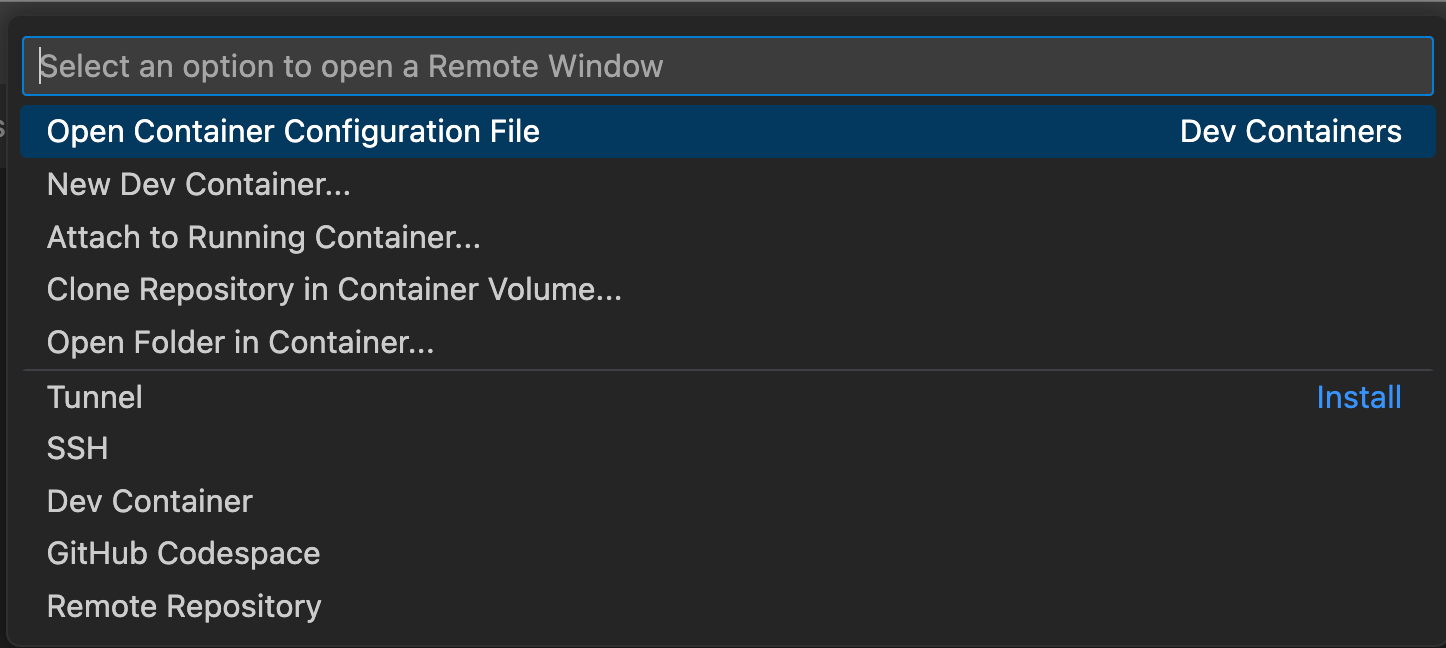
Once the extension is installed, the below menu should be available when clicking the Open a Remote Window button on the bottom left side (marked in light blue in the above screenshot):
Setting Up a Dev Containers Project
There are mainly three methods to add to a project a Dev Containers settings:
- Add the
devcontainer.jsonfile to the project with the environment settings. The file should be placed under the.devcontainerfolder - Use the Dev Container templates to add a built-in
devcontainer.jsonand modify it as needed - Create a GitHub template with customized settings
In this tutorial, we will see how to set up and launch a containerized environment using the Dev Container templates. In the next tutorial, we will dive into the functionality of the devcontainer.json file and see how to customize the container settings. Last but not least, if you have repeated projects with similar environment settings, you should consider creating a GitHub template. For example, I created Python and R templates, which significantly reduced the time it takes to set up a new project. You can read more about setting up a GitHub template in this article.
Hello World!
We will conclude this tutorial with the following "Hello World!" example – adding the extension settings file to a project using a template following the below steps:
- Open the project folder in VScode using the Open Folder… option (under the File menu)
- Click the Open a Remote Window button on the bottom left side to open the extension menu and select Open Container Configuration File option

- As we want to add the configuration files to the project, select the second option – Add configuration to workspace

- Next, you will have a list of container templates to select from that includes different Linux flavors (i.e., Ubuntu, Alpine, etc.), containers with programming language settings (i.e., Python, Node.js, Java, etc.), databases (i.e., Postgres, etc.), and others. A full list of templates is available here

- Let's select the Ubuntu template using the Jimmy version

- The following menu enables you to add additional features such as CLI tools, language-supporting tools, etc. We will skip it and click the OK button on the top right to finalize the process

This will add the below two folders to the project folder:
.
├── .devcontainer
│   └── devcontainer.json
└── .github
    └── dependabot.yml
This includes the below devcontainer.json file:
// For format details, see https://aka.ms/devcontainer.json. For config options, see the
// README at: https://github.com/devcontainers/templates/tree/main/src/ubuntu
{
 "name": "Ubuntu",
 // Or use a Dockerfile or Docker Compose file. More info: https://containers.dev/guide/dockerfile
 "image": "mcr.microsoft.com/devcontainers/base:jammy"

 // Features to add to the dev container. More info: https://containers.dev/features.
 // "features": {},

 // Use 'forwardPorts' to make a list of ports inside the container available locally.
 // "forwardPorts": [],

 // Use 'postCreateCommand' to run commands after the container is created.
 // "postCreateCommand": "uname -a",

 // Configure tool-specific properties.
 // "customizations": {},

 // Uncomment to connect as root instead. More info: https://aka.ms/dev-containers-non-root.
 // "remoteUser": "root"
}
Which includes two arguments:
name-sets the project nameimage– defines the image details, in this case, pointing out to Microsoft Ubuntu image (mcr.microsoft.com/devcontainers/base:jammy)
Last but not least, to open the folder inside the container, go back to the Dev Containers menu and select the Reopen in Container option:

This will open the folder inside a container – in this case, the Ubuntu image we selected above.
Summary
This post reviewed the core functionalities of the Dev Containers extension and the general requirements for setting it up. In addition, we saw how to add the Dev Containers setting files to a project using a template. This is just the tip of the iceberg of the Dev Containers extension functionality. In the following posts, we will dive into the core functionality of the devcontainer.json file and see how we can customize the container and the environment setting. This includes using Dockerfile, setting environment variables, and spinning multiple containers with Docker Compose.
Resources
- Code: https://github.com/RamiKrispin/dev-containers-medium
- Dev Containers documentation: https://code.visualstudio.com/docs/devcontainers/containers
- Dev Container templates: https://containers.dev/templates
- Setting a GitHub template: https://medium.com/@rami.krispin/setting-a-dockerized-python-development-environment-template-de2400c4812b
More content is available on my data science channel.
